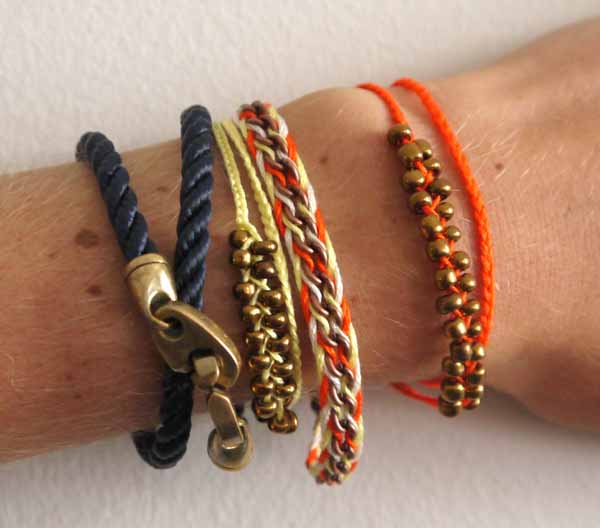
DIY Braided Chain Bracelet

I’ve been arm-partying my brains out on the blog lately with all these bracelet DIYs, and I think this will be the last one for a while as I move on to bedazzling other clothing items.

Because going out with a bang is the only way to go, this braided chain bracelet is probably my favorite DIY I’ve done all year. It’s simple to do and the result is (in my opinion) adorable.

You’ll need:

  • Embroidery floss
  • A chain (I got mine at A.C. Moore)
  • Jewelry clasps
  • Masking tape
  • Pliers

  1. Start by cutting three equal lengths of thread (enough to braid around the chain twice). Get a segment of chain long enough to wrap once around your wrist using pliers to separate the chain links. For the thread, you can use three strands of the same color, or switch it up. I went for a citrus color theme and used orange, off-white and yellow. Tie the end of the thread in a knot around the end of the chain.
  2. Secure the ends to a table with masking tape. This makes braiding a lot easier.
  3. You’ll then start braiding the thread next to the length of chain, looping each strand through a link in the chain when it is on the side of the braid closest to the chain. Continue this until you reach the end of the chain.
  4. Secure with a knot, attach a clasp to the last chain link using pliers, and then tie the thread in another knot on the other side of the clasp.
  5. You’ll now repeat the braiding process going down the other side of the chain.

When you reach the end, knot the thread and prevent fraying by dotting with hot glue. Secure a clasp on the end using pliers and you have yourself a fun new bracelet!

I layered mine with two of the braided bead necklaces I posted a few weeks ago (see the tutorial for making them yourself HERE) and this nautical rope bracelet from Sailormade. I thought the dark blue balanced out the orange and yellow nicely.

If you make your own, I’d love to see! Share a picture of your braided chain bracelet with me on Facebook or Twitter!

DIY Neon Braided Bead Bracelets

Sorry I was MIA yesterday—someone had a little too much fun on 4th of July and needed a whole lot of sleep.

This DIY bracelet is so quick and easy compared to the beaded wrap bracelet I made a couple weeks ago. I originally got the idea from Pinterest months ago, and my roommate had even made me one. Eventually I had to cut it off though, and wanted to make my own with clasps so I could remove them and mix-and-match them at will. Since it’s summer and neon is huge this season, my color choices were a no-brainer.

You’ll need thread (I used embroidery floss), beads, clasps, a piece of tape and a hot glue gun.

  • Loop the thread through the clasp and back up. I used about 20” total because I wanted the bracelet to wrap around my wrist twice. Thread the end back through the clasp and secure with a knot. Cut the bottom loop so that you now have three strands of thread attached to the clasp.
  • Begin braiding. It’s easiest if you tape down the end to a table.
  • When you want to start the beaded section, simply continue the braid, adding one bead to the thread before weaving it over the others. When you’ve added the desired about of beads, carefully push the beads up so that the braid is taught and the beads secured in place. Continue to braid.
  • To finish the bracelet, add the other end of the clasp (I braided it right into the end), knot it, cut off the excess thread, and secure with a dab of hot glue to keep the ends from fraying.

Voila! Pretty simple, right?

Happy Friday, everyone! Enjoy the weekend!

DIY Beaded Wrap Bracelet

Pinterest, tumblr and fashion blogs everywhere are filled to the brim with close-up shots of “arm parties”—wrists stacked with bracelet upon bracelet. I love the look, but have always had an issue when it comes to this piece of jewelry because my wrists are unnaturally small. Every single year I would get a nice bracelet for Christmas. Every single year it would slip off my toddler-sized wrist and be lost forever.

For this reason, I love making my own bracelets, custom-sized to fit me. And after making these tribal beaded earrings, I’ve been on a serious bead kick, so this wrap bracelet was an easy choice.

Before you undertake this project yourself, be warned: it takes HOURS. You’ll make the bracelet using a square stitch, which essentially requires you to individually loop each tiny bead on to its surrounding beads one at a time. I made this bracelet over the course of a few days, doing a little here and a little there.

You’ll Need:

  • Beads (colors of your choice)
  • Beading wire (I used thread because I was too lazy to drive to A.C. Moore, but I don’t recommend you do the same. The bracelet will be far too delicate and easy to destroy)
  • Needle
  • A button

INSTRUCTIONS

  1. Cut a long piece of string/wire (as long as you think you can manage without it tangling). Depending on how many times you want the bracelet to wrap around your wrist, this DIY requires a LOT of thread/wire. You’ll need to add segments by tying ends together.
  2. Begin your square stitch, leaving at least 8 inches of thread/wire at the end (you’ll need the extra wire to attach the button at the end). I used a row width of 5 beads, but you can vary this depending on how thick you want your bracelet. I’ve drawn out what a square stitch looks like because I felt it was clearer than the photos I took. You’ll use this technique row after row. There’s a great animated tutorial over at Silver Hill Design that I highly recommend if my picture isn’t helping.
  3. When you get to the end (17 million hours later), secure the last bead by wrapping the thread through it several times. String on enough beads to form a loop big enough for the button to fit through. This will depend on the button you choose; I needed 16 beads to form my loop. Secure by looping the thread through the last row of beads several times, ending with a knot.
  4. Go back to the starting end of the bracelet and attach the button using the same technique used for the loop clasp: thread the wire through the last row of beads several times and through the button, securing with a knot.

For my wrap bracelet, I mixed up the patterns between color-blocked stripes and zigzags because I wanted an eclectic mix of color when it was wound around my wrist.

Hope you all have a great weekend! I’m headed off to NYC tonight and then to the Jersey Shore for the remainder of the weekend (look out, Pauly D!).