Park Bench Workout

Park Bench Workout
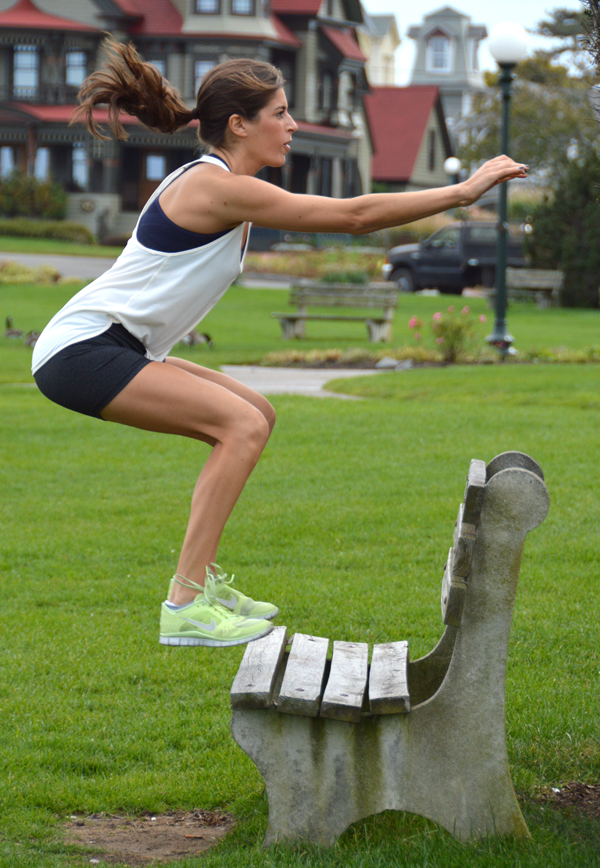
You don’t really need a park bench for this one—a block would do, or stacked steppers at the gym, or really any sturdy, elevated platform. But we’ve had such gorgeous fall weather in New England lately that I couldn’t resist taking this workout outside. The pictures were taken last weekend on the Vineyard when I was there for my cousin’s wedding, but when I first did the workout, I used a bench in a creepy church playground by my place in Boston. I don’t think I’m a registered sex offender as a result, but doing jump squats in little kids’ faces was a lot more awkward than anticipated.

Calm down, I’m joking.
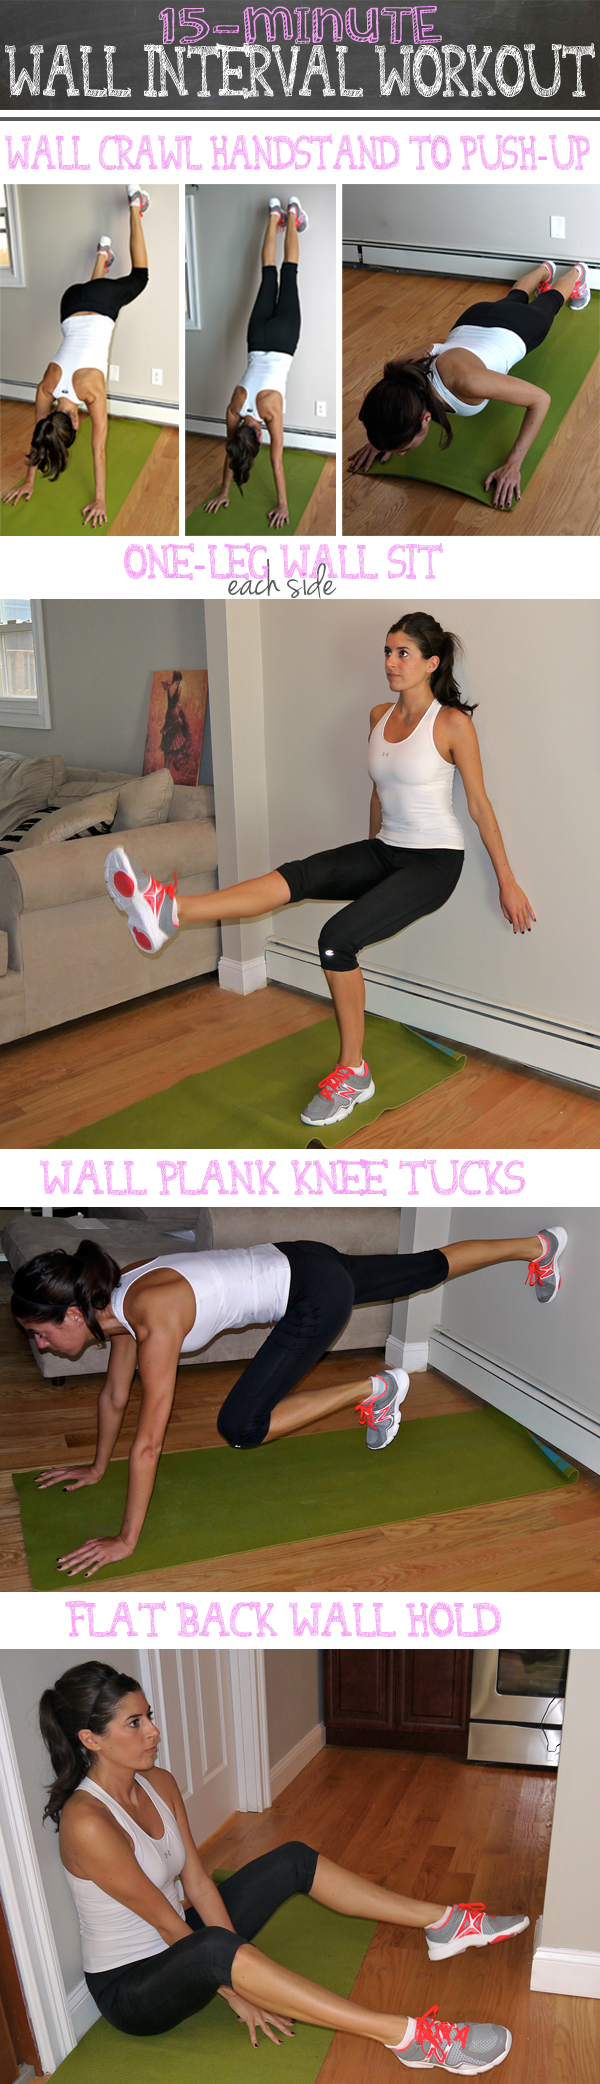
Park Bench Workout

Set your Gymboss Interval Timer for 30 rounds of 45 seconds of work and 15 seconds of rest. You’ll go through five rounds of the following exercises. Try to complete as many reps as possible during each 45-second interval.

Park Bench Workout

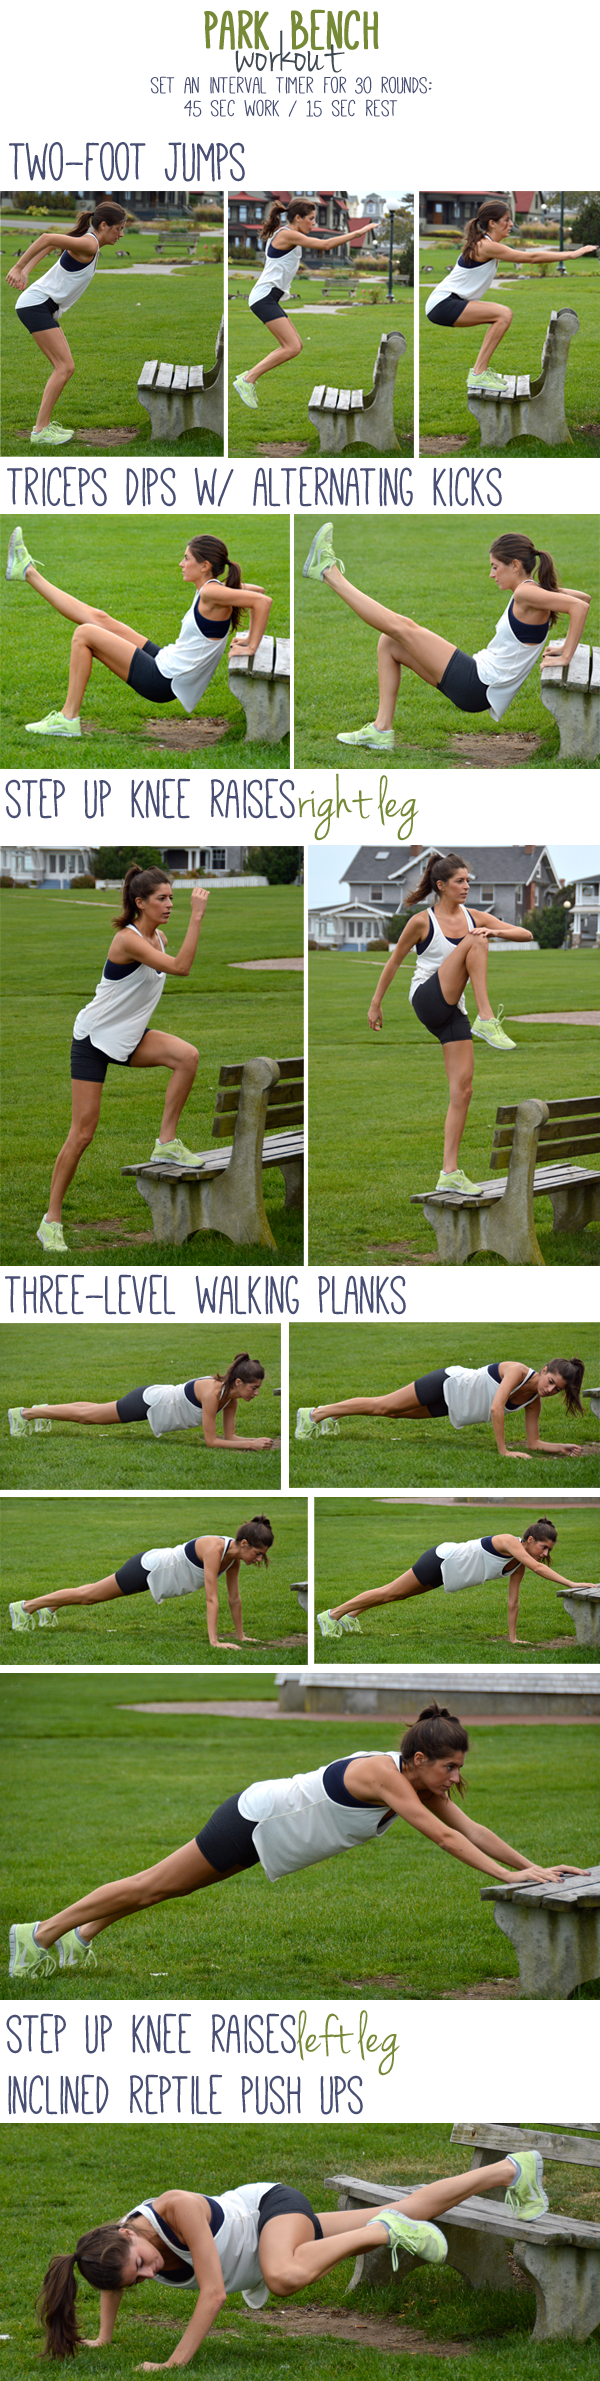
  • Two-Foot Jump: Stand about a foot in front of the bench, bend your knees and jump both feet up at the same time, landing on the bench in a squat position. Jump back down and repeat.
  • Triceps Dip with Alternating Kick: Start in a table top position, hands on the bench, facing forward on either side of you; knees bent at 90 degrees. Dip down, keeping your elbows facing back while you bend them and kick your right leg straight upward as you lower your body. Push through your hands back to the starting position, lowering your right leg. Repeat, kicking up your left leg.
  • Step Up with Knee Raise (right): Stand with right foot on the bench and left foot on the ground. Step up, lifting your left knee up into your chest. Lower back down to starting position, but try not to come to a rest—your weight should always be on that right leg, not the left. Think of it as a quick push-off tap with your left foot when it meets the ground.
  • Three Level Walking Plank: Start in an elbow plank facing the bench. One hand at a time, walk yourself up into a standard plank position. Then again, one hand at a time, walk yourself into an extended elevated plank position with both hands on the bench, outstretched before you. Reverse the motion back down to an elbow plank. Each time you go through the sequence, alternate the hand you lead with.
  • Step Up with Knee Raise (left)
  • Inclined Reptile Push Up: Start in an inclined plank position with feet on the bench and hands on the ground. Lower into a push up, and as you do, crunch your right knee in towards your right elbow. Return to starting position and repeat on the left side. As you can tell from the picture, I am not very good at these (I’m a push up wimp). If you need an easier version just cut out the push up and do a reptile plank.

WEARING | Tank: Lululemon // Shorts: c/o Cory Vines // Sneakers: Nike Free Run +3

Where’s the least conventional place you’ve worked out lately?

signature

15-Minute Wall Interval Workout

15-minute wall interval workout(This picture = Nerd Alert!)

It feels like forever since I last posted a workout! But while I may have been slacking in the blogging department, I definitely haven’t been when it comes to working out. I always find that I’m most dedicated to fitness in the fall—there’s something about summer and all its craziness ending that makes sticking to a daily routine feel so unbelievably relieving, and lately that routine has included lots of working out.

Another thing fall brings for me each year is an intense urge to revamp my wardrobe—workout apparel included. Neon-spandex-everything is out, and I’m now sticking to darker colors and warmer basics. When the awesome people over at Champion sent me these black knee tights from their PowerTrain collection, I was pumped—they go with everything, are perfect for fall weather, and have a comfortable waistband (which is always my top priority!).

Wall Interval Workout

Equipment I Used:

  • Gymboss Interval Timer
  • Exercise mat
  • A wall

Today’s routine is awesome because you don’t need any equipment—just a wall! If you’re worried about leaving scuffmarks, you might want to do it in an unfinished basement or take it outside and use a sturdy fence or cement wall.

Set your Gymboss Interval Timer for 15 rounds of 50 seconds of work and 10 seconds of rest. You’ll go through the following set of exercises three times.

15-Minute Wall Interval Workout

Wall Crawl Handstand to Push Up: Start standing with your back to the wall, feet about a foot from the wall. Bend over, placing hands on the ground, and put one foot on the wall, and then the other. Slowly walk your feet up the wall while also walking your hands in towards the wall.

Your goal is reach a point where your legs are straight, but this will vary depending on your skill level. If you’re a handstand pro, you may feel comfortable walking your hands all the way in towards the wall so that your body is in a vertical line against the wall. If you’re a beginner, you might not be able to walk your hands in very far, so your body will be at an angle closer to horizontal. Regardless, once you reach this straight-leg point, you’ll then reverse the motion, walking your feet down the wall, and hands away from the wall.

When you’re on all fours again, walk your hands into a plank position and do a push up. Repeat the whole movement, immediately starting to walk your hands and feet in and up.

One-Leg Wall Sit (Right): This is a regular wall sit (back against wall, legs bent at 90-degree angle, feet shoulder-width apart), only you’ll extend your right leg straight out, holding it parallel to the ground.

One-Leg Wall Sit (Left)

Wall Plank Knee Tucks: To get into the starting position, do a plank with feet close to the wall and step them up onto the wall, walking your hands in a couple inches if necessary, so that your body is parallel to the ground. Tuck one knee in towards your chest and then the other, continuing to alternate.

Flat Back Wall Hold: Sit on the floor with your back straight and flat against the wall, knees slightly bent and feet a little wider than shoulder-width apart. Place your hands between your legs, on the floor for support. Pressing into those fingertips and squeezing your abs in tight, lift your feet about half a foot off the floor.

I loved this workout because it was, well, way too hard for me. I finished feeling like wow, there is a LOT of room for improvement here. I’m still not confident enough to get myself flat against the wall in a handstand; I had to modify the wall sits halfway through by crossing the extended leg over the supporting knee; in the last round I had to take two breaks during the wall plank knee tucks; and I couldn’t make it the full 50 seconds holding my feet off the ground with the wall holds.

It can be a little defeating when you seem to have so inadequately gotten through a workout, but I like to think of it as a fitness benchmark. I’m going to practice my handstands, continue pushing myself, and then revisit this same routine a month or so from now to try and improve upon my last performance. This is a great way to gauge progress, and you get such a great sense of accomplishment when something that once seemed so beyond your abilities gets easier and easier for you to tackle!

WEARING | Leggings: c/o Champion // Top: Under Armour (old) // Sneakers: New Balance

signature

Towel Workout

After you finish this workout, you’ll understand why hockey players have such phenomenal butts. That whole low-friction surface thing is no walk in the park.

As a devoted boycotter of expensive gym memberships, this is one of my new favorite workout routines. You’ll need two dishtowels. That’s it. No fancy equipment. Now, you may recall me embarrassingly admitting that for this chair workout I had to go to my parents’ house because…I didn’t own chairs (I do now!!! I’m a grownup!!). But even I own dishtowels.

If you have a hardwood floor, that’s ideal, but if not (I don’t have one of them thangs either…damnit), do the workout in your kitchen. I’m assuming you don’t have a carpeted kitchen. That’d be…different.

Towel Workout

Equipment I Used:

  • 2 dishtowels
  • Gymboss Interval Timer

Set your Gymboss Interval Timer for 30-second intervals of work followed by 10 seconds of rest. You’ll go through this sequence 9 times, for a total of 45 rounds. This workout takes 30 minutes, but if you want to cut it back to 20, just go through the whole sequence 6 times instead. Complete as many reps of the exercise as you can (without sacrificing proper form) during the 30 seconds of work.

  • Sliding Plank Crunches: If you’ve ever used a power wheel/ab roller, you’re familiar with this move. Start in plank position with feet on a towel. Slide feet forward in unison, tucking your knees into your chest. Slide them back out into starting plank position before repeating the crunch tuck.
  • Sliding Side Lunge (Right): Start standing with your left foot on a towel and your right foot on the ground, shoulder-width apart. Slide your left foot out to the side, bending your right leg in a deep squat. Stand back up, steadily sliding your left foot back inward.
  • Sliding Side Lunch (Left)
  • Sliding Mountain Climbers: Start in a plank position with a towel under each foot. At a quick pace, slide one foot up, bringing that knee to your chest, and alternate, sliding the other foot up as you slide the first foot back. Just like a traditional mountain climber (horizontally running in place), only keeping your feet on the ground.
  • Reverse Plank Heel Slide: Start in a bridge position: shoulder blades on floor, knees bent with feet on a towel, butt lifted. Slide your heels out on the towel, keeping butt off the ground and body in a straight line, until you’ll outstretched in a reverse plank position. Pull heels back inward until you’ve reached your starting position. This move targets your hamstrings. And by “targets” I mean “f#@*ing brutalizes.” In a good way.

Sorry for the poor photo quality with this post. Shooting at night after work leaves me with two crappy options: washed out flash pictures or grainy dark pictures. One day, when I’m a professional blogger, I’ll have all the sunlight and daytime hours in the world to take beautiful pictures. Until then…