Weighted Core Workout (Time Pyramid)

20-Minute Weighted Core Workout

Are you guys sick of core workouts? I know I post a ton, but the reasons I love them are many:

  • It all comes back to the core. Even when you’re isolating the legs or arms in an exercise, your core is working — they do attach there, afterall! Core strength and stability leads to better posture and alignment, reduced back pain, better control of the extremities and so much more.
  • Your form in other exercises improves if you have a strong core. Continuing my first point, I’ve noticed a huge difference in my ability to properly do exercises like push ups, deadlifts–the list goes on–as my core strength has improved.
  • Core workouts are great to pair with cardio. Especially with the long runs I’ve been doing for marathon training, I love having quick(er) core workouts on hand that don’t exhaust the legs.
  • It’s personal. My stomach (low belly specifically), has admittedly always been a bit of a frustration for me. Everyone’s body distributes weight differently (yay genetics), and that area happens to be the last place from which I lose fat. I swear if I gained 10 pounds, 8 of them would go to the five inches below my belly button. Something that’s helped me accept and love this part of my body is focusing on what it can do rather than how it looks. Sure, you can’t see a six pack, but my core is strong AF and I’m damn proud. I love working to improve my core strength and function!

Weighted Core Workout (Time Pyramid)

Equipment I Used:

This workout will take you 20 minutes to complete. You’ll go through the circuit three times, each time through reducing the amount of time spent on each exercise. Here’s a breakdown:

60 seconds each exercise (no rest between exercises)
Rest 60 seconds
45 seconds each exercise (no rest between exercises)
Rest 60 seconds
30 seconds each exercise (no rest between exercises)

The flow of the workout is a method used on the megaformer: Focus on one side of the body, center the work, focus on the other side, center. 20-Minute Weighted Core Workout

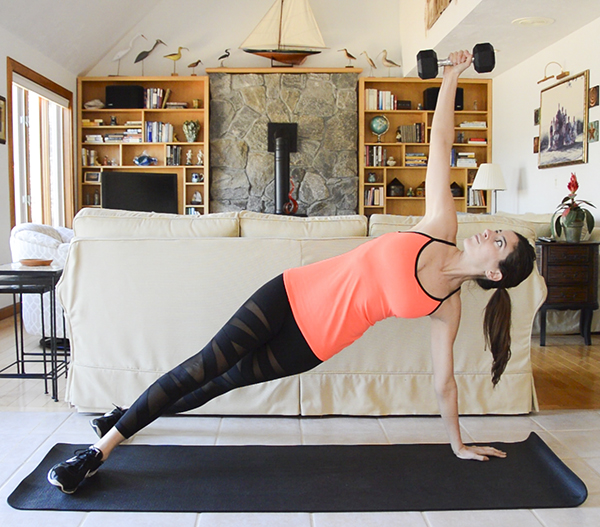
Thread the Needle Plank Rotation RIGHT | Start in a plank position with hands underneath shoulders, right hand gripping the dumbbell. Once you start the movement, you won’t return to this position (dumbbell won’t touch floor again). Rotate your body open to the right, dropping your heels so that you’re on the edges of your feet in a staggered side plank position. As you do reach the dumbbell up to the ceiling. Twist back to center plank, rolling back to the balls of your feet and squaring your hips as you wrap the dumbbell through the space between the floor and your chest, reaching it across your body to the left side of the room (like you’re giving yourself a one-arm hug). Reverse the movement, rotating back open into side plank, extending the weight back up to the ceiling.

This one will work both sides of your obliques (right as you twist through center threading the needle), left as you twist open and support your bottom sidebody. I always feel it more in the side holding the weight though.

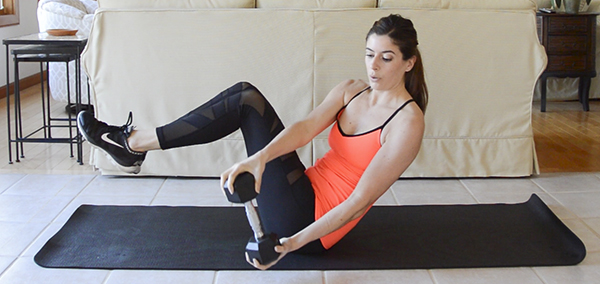
Russian Twist Sit Ups RIGHT | Start laying on your back with legs outstretched and hovering a couple inches off the ground. Holding a dumbbell in your hands, arms should be outstretched overhead and hovering as well. From this starting position, crunch up, bringing your knees in towards your chest as you lift your shoulder blades off the ground and bring the weight up and over to the right of your legs. Twist through your waist as you do this, stopping the weight a couple inches off the ground and then extending back out, lowering to starting position. Repeat, crunching and twisting in the same direction the whole time.

The goal is to never bring the legs and/or med ball to rest on the ground when you extend out and crunch up.

Side Plank Row and Leg Left RIGHT | Start in a side plank position, right hand stacked under right shoulder, dumbbell in left hand (start with a straight left arm, weight held a few inches off the ground. From here, row the left elbow straight up towards the ceiling, bringing the weight up towards your upper ribs/armpit. As you do this, lift the top left leg up to a hover (without letting your hips sag down!). Pause at the top and then lower the weight and leg back to starting position.

Even though it’s the top left arm and leg that are moving, the right obliques are targeted as you work to keep the hips lifted in the side plank position.

Weighted Sit Ups (weight to chest) | Simple move, yet so challenging! Start laying on you back with knees bent and feet flat on the floor about hips width apart. Hold a dumbbell at your chest. From here, you’re going to do a sit up, crunching your shoulders then full back off the floor, bringing your chest in towards your knees. The challenge? Keep the dumbbell touching your chest the entire movement and keep your feet touching the ground.

You’ll be tempted to extend the dumbbell out in front of you to facilitate the sit up. Your heels may want to lift to a hover. Don’t let either happen! I’ll actually flip my grip on the weight so that i’m holding it secure into my chest and don’t have the option to extend it away.

Thread the Needle Plank Rotation LEFT

Russian Twist Sit Ups LEFT

Side Plank Row and Leg Left LEFT

Full-Body Crunch | Start laying on your back with legs outstretched and hovering a couple inches off the ground. Holding a weight in your hands, arms should be outstretched overhead and hovering as well. From this starting position, crunch up, bringing your knees in towards your chest as you lift your shoulder blades off the ground and bring the weight up and over towards your shins. Extend back out, lowering to starting position. The goal is to never bring the legs and/or weight to rest on the ground when you extend back out. 20-Minute Weighted Core Workout
WEARING | tank c/o New Balance // Lululemon leggings (old but you can shop their current selection here) // Nike Flex Supreme TR 3 sneakers (on sale now … kinda–like $5 off haha)

Housekeeping

Shop and save for a cause!

ToeSox is offering my readers 15% off any purchase with code pumpsandiron. A portion of the sales go to my Boston Marathon fundraiser benefiting the Massachusetts Association for the Blind & Visually Impaired. The code expired tomorrow afternoon so if you haven’t taken advantage of it yet, get shopping! 😉

Lokai SnapChat Takeover

Tomorrow I’m taking over Lokai‘s SnapChat! I’ll be sharing some at-home workout moves and a yummy smoothie bowl recipe. Follow along @livelokai!

signature

15-Minute Legs & Butt Slider Workout (+Video!)

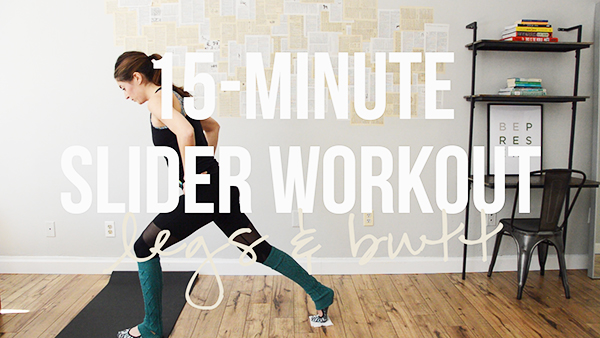
15-Minute Slider Workout - focus on legs & butt | pumpsandiron.comIt’s about damn time I started doing these workouts in video form! I know it’s Thursday, but with today as an exception, I plan to upload a new workout video & post every Tuesday. Keeping on that schedule will be helpful in planning shoots and editing.
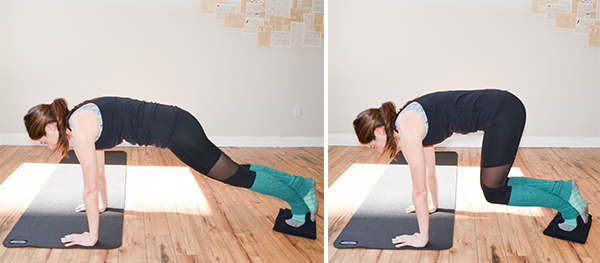
I figured it’d be fitting to kick off the workout videos with something similar to what I teach in Boston on the megaformers. All you’ll need is on object that’ll allow you to slide across the floor (glider, dish towel, etc.). I recently made the genius discovery that the duster pads you put on a Swiffer mop work PERFECTLY for this (with the added “bonus” of cleaning your floor as you workout).

Watch the Video

Let’s do the workout together! How exciting is this?? Watch the workout below in real time and follow me on YouTube.

15-Minute Legs & Butt Slider Workout

Equipment I Used:

  • Slider (I used a Swiffer duster pad but you can use a dish towel or anything that glides across your floor)
  • Exercise mat

FYI This workout is going to make waaaaay more sense if you follow along with the video. But in the best way I can describe it through writing, the workout is made up of a few exercises, with variations within each move. For example, you’ll do a lunge for two minutes but within those two minutes there’ll be pulses and slides to switch it up. I’m calling the major exercise grouping “complexes” in the below descriptions. 15-Minute Slider Workout - focus on legs & butt | pumpsandiron.com

Squat Complex

Numbers indicate seconds (how long to stay on each part).

  • [30] Squat 
  • [15] Pulse | Hold the bottom of your squat and from there, pulse up an inch and down an inch
  • [15] Hold | Hold your lowest squat point.

Single-Leg Squat Complex on the Right

Do this twice through (numbers indicate seconds):

  • [30] Single Leg Squat | Start standing with your  right foot on the exercise mat and your left foot on the towel. Sink down in a squat on the right side, bending the right knee and shifting your weight into the heel as you shift your hips back and down. Your left leg will stay straight as you slide it out to the side. Try to keep the weight of your torso over the right heel (don’t transfer weight into your left foot). To accomplish this, picture you’re sitting straight back into a chair on your right side; don’t let your hips shift out to the side with the left foot, press them back and down over the right heel. When you’ve reached your lowest squat on the right side, push through the right heel to stand back up, stopping with a soft, micro-bend in the right knee.
  • [15] Pulses | Hold the bottom of your squat and from there, pulse up an inch and down an inch by pressing up through your right heel. The non-target leg should slide a little across the floor as you pulse up and down on the right leg.
  • [15] Skate Non-Working Leg | Hold the bottom of your squat and keeping your bodyweight in the right heel, bend your left knee, sliding the left foot in towards the right and then extending the leg back out straight to the side. Keep your left foot light; just gingerly slide it across the floor, focusing on the isometric hold on your right, target side.

Lunge Complex on the Right

Do this twice through (numbers indicate seconds):

  • [30] Sliding Back Lunge | Start with your right foot on an exercise mat and the ball of your left foot planted on the floor a few inches behind. Keeping your bodyweight in the right heel, start to slide backwards into a deep lunge, bending the right knee as your hips slide back and down and your left foot glides straight back behind you. When you reach your lowest point, press through the right heel as you straight the right leg and rise back up. Don’t lock the knee out straight at the top; keep a soft micro-bend in it and then slide right back down into your next lunge. Back left heel should stay lifted the whole time.
  • [15] Pulses | From your lowest lunge point (right knee should be at a 90-degree bend if possible), pulse up an inch and down an inch by pushing up through your right heel. It’s a tiny straightening and bending of the right knee, not a dipping of the back knee.
  • [15] Back Knee Pulls | From your lowest lunge point (right knee should be at a 90-degree bend if possible), hinge forward at hips slightly so that the weight of your torso is over the right leg rather than completely upright. Keeping your bodyweight in your right heel and staying low on the right leg, bend your back left knee as you slide the left foot forward and then extend it back out behind you. Try not to transfer your bodyweight into the left foot as you do it—keep it light as it slides across the floor.

Finish with

  • [15] Long Jump Hold | Hold your lowest lunge point (right knee should be at a 90-degree bend if possible) and hinge forward with your torso until your chest hovers above your thigh. Extend your arms behind you. Hold the position.

Single-Leg Bear Complex on the Right

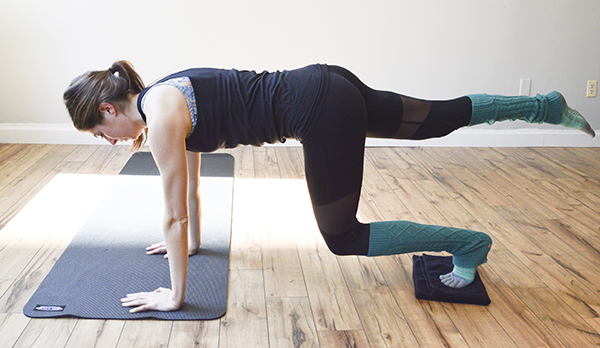
  • [45] Single-Leg Bear | Start in a plank position with your right foot on the slider and your left leg hovering in the air. Do a bear crunch with the right side, sliding your right knee in towards your elbow and then extending the leg back out in a plank while your left leg hovers. Torso stays in tabletop as you do this (you should feel your quad work).

Modify it. This one is a killer. To make it easier, hook your left foot over your right ankle as you do it. I personally alternate between the advanced version and this modified version throughout the 45 seconds. 15-Minute Slider Workout - focus on legs & butt | pumpsandiron.com

  • [15] Single-Leg Bear Tabletop Hold | Stop the movement with your right knee bent at 90 degrees, knee hovering a couple inches off the floor, body in tabletop. Your left leg is hovering extending out straight behind you. Engage your core and close your eyes if needed–that right quad should be on fire holding this position after everything you just did!

[60] Forearm Plank

Repeat from Top on the Left

Get 15% Off for a Good Cause

15-Minute Slider Workout - focus on legs & butt | pumpsandiron.comWEARING | grip socks & leg warmers c/o ToeSox (see below for discount code) // Michi leggings (sold out but similar style HERE) // Fabletics tank (sold out but similar from Nike HERE) // bra c/o WITH

I’ve mentioned ToeSox on the blog a bunch because I’m obsessed with their thigh-high leg warmers and wear the grip socks while teaching megaformer classes all the time. In the most generous gesture, they’re offering you all 15% off any order with the code pumpsandiron. A portion of all sales using that code will be donated to The Massachusetts Association for the Blind & Visually Impaired, the charity my marathon fundraiser is benefiting. Amazing! So if you need an excuse to shop without the buyer’s remorse, here it is. 🙂

Thanks for your support!

I welcome all feedback, both positive and negative (as long as  you’re not a dick about it haha). I want these videos to be helpful so let me know what you’d like to see from them moving forward if this one isn’t cutting it!

Any old workouts from the archives you’d like in video form? I plan to post new workout videos every Tuesday but I’m also happy to go back and make videos for workouts that I’ve already posted. If there are any that you found too confusing to follow via pictures, let me know in the comments!

signature


Tabata “Jacks” Workout

Tabata "Jacks" Workout - This tabata workout will take you just under 20 minutes. #tabata #hiit #workout #fitness https://pumpsandiron.com

(1/14/19) This tabata jacks workout was originally posted in 2016 and has since been updated to include a video and better images.

I’ve got a new workout for all you tabata lovers! “Jacks” = jumping, so this one will get your heart rate up. All you’ll need is a weight, and even that could be worked around if you don’t have access to equipment.

Tabata “Jacks” Workout

Equipment I Used:

A tabata is 8 rounds of 20 seconds of work and 10 seconds of rest (so a total of 4 minutes long). In this workout, you’ll be alternating between two exercises for each tabata. When you finish one, rest 60 seconds and then move onto the next tabata set. In total, this workout will take you 19 minutes (including rest) to complete. 

As with all workouts, make sure you’re properly warmed up beforehand. Always listen to your body, modifying or stopping as needed. If you want a guided warm up, check out this video of mine.

Tabata "Jacks" Workout - This tabata workout will take you just under 20 minutes. #tabata #hiit #workout #fitness https://pumpsandiron.com

Tabata Workout Breakdown

Tabata #1

See 1:47 in the above video for a demonstration of the exercises.

  • Jumping Jack Press – Holding the weight, you’ll do jumping jacks while alternating between a chest press and an overhead press.
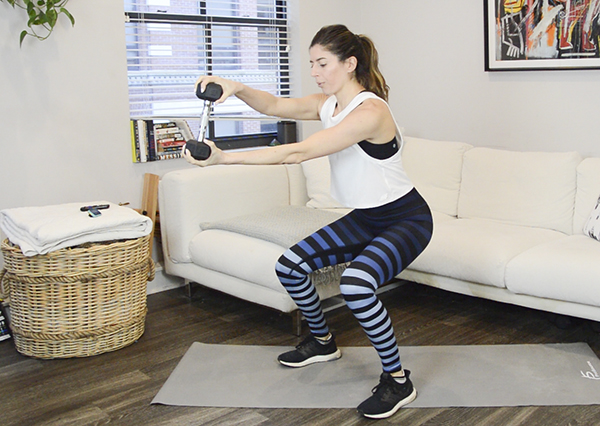
  • Truck Driver Hold – Holding a low squat, extend the weight out at chest height and twist it.

Tabata #2

See 6:14 in the above video for a demonstration of the exercises.

  • Push Up Jacks – Feet jump wide as you lower, feet jump back to center as you press up.
  • Star to Suitcase Crunch – Start in a hollow hold with arms and legs spread and as you sit up, bring elbows to knees.

Tabata #3

See 11:00 in the above video for a demonstration of the exercises.

  • Squat Jacks with Scoop – Weight is at center when feet are wide and then scoop it to the side like you’re paddling a canoe when feet hop narrow.
  • Lunge Stomps – (Optional) hold weight at shoulders as you push off your front leg. Hold it in back and not under your chin so you don’t accidentally hit yourself in the chin with it. Alternate legs each round.

Tabata #4

See 15:49 in the above video for a demonstration of the exercises.

  • Forearm Plank Jacks – In a plank, jack feet wide and narrow. To modify for your shoulders, do these in a high plank position instead.
  • Burpees – Option to do any version of burpees you’d like. I chose not to add the push up at the bottom.

Tabata "Jacks" Workout - This tabata workout will take you just under 20 minutes. #tabata #hiit #workout #fitness https://pumpsandiron.com

WEARING | K-Deer leggings (the shade of blue I’m wearing isn’t available but I’ve linked to a similar color) // New Balance tank

Any requests for workout structure/equipment/target area? I’m creating some new ones to shoot next week and would love to hear from you! 

xo Nicole

Outfit and equipment links are affiliate.