30-Minute Low Body Workout (Glutes) with Resistance Band Loop + Med Ball

You'll need a resistance band and medicine ball for this 30-minute low body workout focusing on the glutes. Video included so you can follow along at home or the gym! | Pumps & IronHope you all had a great weekend! I spent mine on Nantucket, and even though it was a little chilly, it felt like an unofficial kickoff to summer. We rented bikes, hung out with friends, did lots of eating and drinking outside in the sun—it was wonderful. And after a few days of relaxing, I am craving a good sweat! This 30-minute low body workout will pay extra attention to the glutes (my bum was sore for two days after filming it).

30-Minute Low Body Workout (Glutes)

Equipment I Used:

This workout is broken up into three circuits. The first two circuits use a resistance band loop for low-impact, targeted exercises for the glutes. The third and final is a HIIT circuit using a medicine ball to target the lower body with high(er) impact exercises. Rest for 30 seconds in between each circuit.

You'll need a resistance band and medicine ball for this 30-minute low body workout focusing on the glutes. Video included so you can follow along at home or the gym! | Pumps & Iron

Resistance Band Loop Circuit 1: Tabletop Exercises

Do each of the exercises for 30 seconds, moving one right to the next without rest in between. Go through the four exercises twice. First on the right, then on the left.

  • Donkey Kick Pulses | In tabletop position with your hands stacked under shoulders and knees under hips, engage your core and bring your right foot up so that the knee is bent and around hip height. The resistance band should be around your left ankle as an anchor and your right foot. In this position, pulse your right leg up and down a couple inches, keeping tension on the band.
  • Straight Leg Lifts Up + Out | Straighten out your leg at about hip height. From here, lift the leg up then swing it out to the side with control, back to center, and then lower back to starting position. These are small, controlled movements. Keep the top of the foot pointing to the floor the whole time and the hips square.
  • Spider Crunch with Pulses | From tabletop position, lower onto your left forearm so that your upper body is stacked open. Your right kneecap and toes should face the wall, not the floor. Start with your right leg straight and then crunch the knee in to your shoulder and back out straight. Do three straight-leg pulses here. You’ll be targeting the right side but your left glutes need to work as well. Try to keep your left hip stacked over your left knee as best as you can. If you have super tight hips, this can be a tough one. Try doing it laying on your side instead to modify.
  • Tabletop Plank Jacks | Start in a plank position with the resistance band a couple inches above your ankles. Jump your feet out wide (like a horizontal jumping jack), back to center plank, and then bend your knees and hop your feet forward so that you land in a hovering tabletop position (knees under hips hovering a couple inches off the floor).

Resistance Band Loop Circuit 2: Standing Exercises

Do each of the exercises for 30 seconds, moving one right to the next without rest in between. Go through the four exercises twice. First on the right, then on the left.

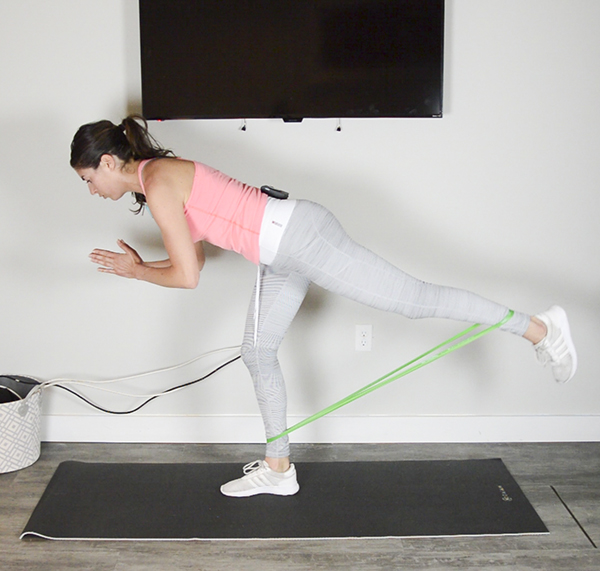
  • Out-turned Straight Leg Pulses | Stand with the resistance band a couple inches above your ankles and your hips pointing forward. Your right leg should be straight, extended behind you at an angle and rotated outward. Keep a soft bend to your left knee. From here, pulse the right leg up and out.
  • Deadlifts | Square your hips to the floor. Keep that mini-bend to the left knee and your core engaged as you tilt forward as if your body is a seesaw. Come back upright with control until your right toes lightly tap the floor.
  • Deadlift Pulses | Hold the tilted position and pulse your back right leg up and down a couple inches.
  • Popcorn Squats | Jump your feet out wide as you sink into a squat and touch the floor with one hand. Jump your feet together as you come upright and then repeat, touching the floor with the other hand.

REPEAT CIRCUIT 1 + CIRCUIT 2

Repeat the two circuits, this time starting on the left side and then the right side.

Circuit 3: Med Ball HIIT

For your final circuit, you’ll do 15 rounds of 30 seconds of work and 10 seconds of rest. You’ll have five medicine ball exercises that you’ll go through three times. It will take 10 minutes in total.

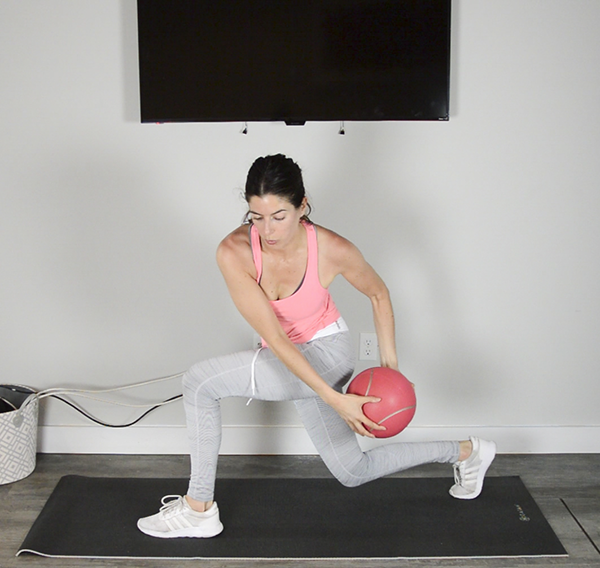
  • Jump Lunge Scoops | Start in a split-stance lunge position, one foot planted on the ground in front, the ball of the other foot planted behind you, both knees at opposing 90-degree angles. Holding the med ball in both hands overhead, do a jump lunge, switching your feet midair and landing back in a lunge with the other foot forward. From here, scoop the med ball down and to the outside of your front leg. Scoop it back up overhead and repeat to the other side.
  • Bottom-Half Burpees with Forward/Backward Hop | Start in a low squat position with med ball at chest. Bring med ball to the floor and jump feet back into a plank. Jump them back up into a low squat position, bring the ball back to your chest and hop backwards, staying low. Repeat, but the next time hop forward.
  • Soccer Taps | This is like high knees but as you drive your knees up, tap your foot on top of the medicine ball. Try to make physical contact with the ball each time without causing it to roll away.
  • Marching Wall Sit | Hold the med ball at chest height. Back against a wall, knees bent to 90 degrees, feet hip’s width apart. Lift one foot at a time, marching the knee up towards your chest.
  • Pivoting Low Lunge – Squat – Lunge | Pulse in a low lunge position with right foot in front and then, staying low, pivot to center and pulse in a low squat position. Finally, pivot to the other side so that the left foot is leading the lunge and pulse there. Stay low the whole time as you pulse right, center, left, center, etc.
You'll need a resistance band and medicine ball for this 30-minute low body workout focusing on the glutes. Video included so you can follow along at home or the gym! | Pumps & Iron

WEARING | Zella leggings c/o Nordstrom // Lululemon tank (old) via thredUP ($10 off your first order with this referral link)

If you try the workout, let me know how it goes in the comments! And if you haven’t already, be sure to subscribe to my YouTube channel. 🙂

15-Minute Lower Body Resistance Band Loop Superset Workout

Resistance Band Loop Superset Workout -- focus is on butt & thighs, only 15 minutes longThis whole YouTube thing has been quite the learning experience. I got a wireless mic so that I could stop doing voiceovers (the mic on my digital camera just does NOT cut it), and it’s a huge advancement, but with it has come a whole new set of challenges. It picks my voice up clearly which is great but it also picks up my breathing which, halfway through these workouts, is much like that of Darth Vader. And then there’s the struggle of securely attaching the mic to my clothes without it slipping out or getting in the way. Not sure if this workout video is a step forward or back, but it’s been fun for me to self-learn the video-making process. I appreciate you all bearing with my not-so-professional videos. One day they’ll be kickass and I’ll look back on these first months and laugh … I hope. 😉

15-Minute Lower Body Resistance Band Loop Superset Workout

Equipment I Used:

  • Interval timer – I used this iPhone app but if you’re looking for a separate timer, the Gymboss MiniMax lets you create multiple-interval workouts
  • Resistance band loop – I recently bought this set of five loops so that’d I’d have a variety of resistance loads to choose from (only $10) and am using the heaviest option for this workout
  • Exercise mat
  • Something to help you balance (chair, wall, table, etc.)

A superset is two exercises performed back-to-back. There are lots of ways to couple moves; today we’re going to pair a high(er) impact move (think big movements and jumping) with a smaller, more controlled pulse or lift. For each superset: Exercise 1 for 30 seconds + Exercise 2 for 30 seconds + Rest for 10 seconds x4. Don’t rest between exercises in the set. Once you finish four rounds of the first superset, move onto the second (rest for 30 seconds in between supersets).

Resistance Band Loop Superset Workout -- focus is on butt & thighs, only 15 minutes long

SUPERSET 1

30 seconds each exercise back to back + rest 10 seconds after finishing both moves x4

  • Squat Jacks | Start in a low squat position with feet wide, band around your thighs above your knees. Staying low in a squat, jump your feet in close together and then jump your feet out wide again to the starting position. Every time your feet jump wide, touch the floor with your hand, alternating hands each time. This just keeps you in check to ensure you’re staying low.
  • Hip Bridge – alternate between dips and pulses | Each time you come to this move, alternate between a full range hip bridge dip and a bridge hold at the top with a little pulse combo. For the dip: lay on your back, heels under your knees and lift your hips up into a bridge position and then back down to a hover. Actively press out against the band as you do this. Squeeze into the base of your seat as you lift the hips, rather than just arching the low back. For the pulse combo, hold the hip bridge at the top and pulse the knees out wide and then the hips up high, back and forth.

SUPERSET 2

30 seconds each exercise back to back + rest 10 seconds after finishing both moves x4

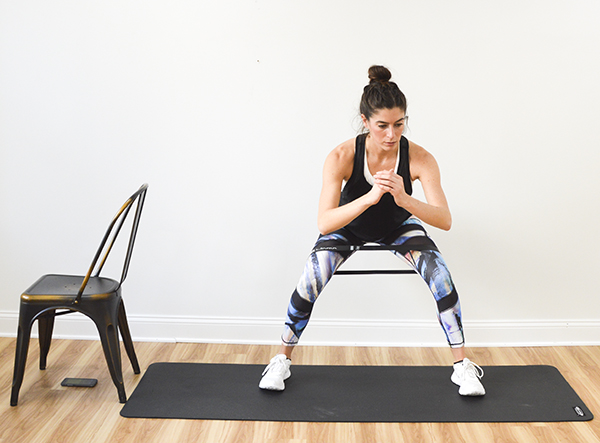
  • Side to Side Step with Squat Jump | Start in a low squat and staying low, step to the right three times, do a jump squat, land low and repeat, stepping to the left this time. You want to keep tension on the bungee as you do these so don’t let your knees come together too narrowly.
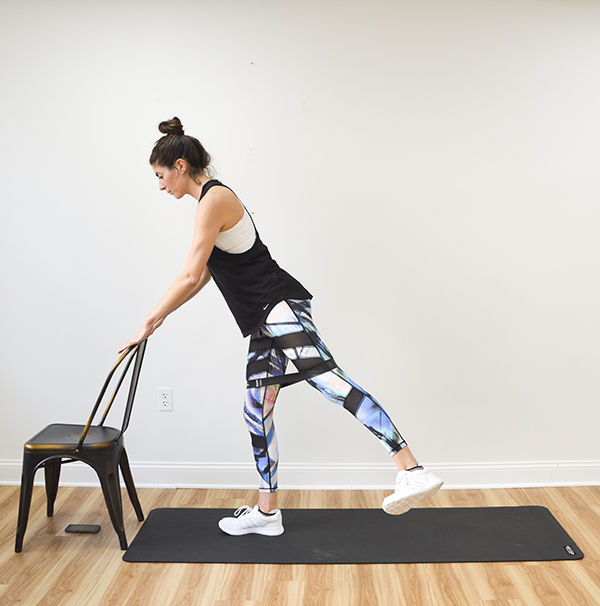
  • Standing Angled Leg Lift (alternate legs each round)| Stand facing a chair/bar/wall and place your hands lightly on it for support. Lean forward slightly with your upper body, keeping your core engaged (this is going to help you stay out of your low back and more easily target the glutes). From here, lift your right leg up and back, keeping the leg straight. Rotate your thigh bone outward so that toes angle out. Square your hips so that both hip bones point forward. From here, lift your right leg up and back. This will be a relatively small movement. Make sure your standing knee is soft and not locked out.

SUPERSET 3

30 seconds each exercise back to back + rest 10 seconds after finishing both moves x4

  • Cowboy Walk (4 up, 4 back) with Squat Jump | Picture how cowboys walk in the old movies, kinda swinging their legs out as they step forward. You’re going to do that staying low in a squat. Walk four steps forward, four steps backwards, and then do a jump squat, landing back down low and starting from the top.
  • Clamshell (alternate legs each round) | Lay on your side and rest your head on your bottom arm. You want a straight spine so squeeze the core, lifting the waist away from the floor a bit. Bend your knees at about a 45 degree angle and keeping the toes touching, rotate the top knee up and open. Keep your hips stacked one on top of the other as you do this (it’s really easy to roll open–don’t!). This should be a small movement, keeping tension on the resistance band the entire time.

Resistance Band Loop Superset Workout -- focus is on butt & thighs, only 15 minutes long

WEARING | leggings c/o Nualime (also love this twisted floral pattern) // Nike tank // adidas sneakers

Let me know if you try this workout! And back to YouTube–who are your favorite YouTubers to follow?? I need suggestions!

signature

Links to outfit details are affiliate. I appreciate your support! 🙂

Resistance Band Core Workout

Resistance Band Core WorkoutResistance bands are the easiest piece of workout gear to pack, and when I went to visit my parents on the Vineyard at the beginning of the month, I brought one along. I wanted to do a quick ab workout to pair with my morning run, and this totally did the trick. By adding the resistance band around my legs during some of these go-to core exercises you’ve seen a million times on the blog, it changed each move from strictly targeting the abs to incorporating some outer thigh work as well.

Resistance Band Core Workout

Equipment I Used:

This workout is broken up into three parts. For each part, you’ll do three rounds of three exercises for 30 seconds each. Go from one exercise to the next without taking a break. Between parts, you can rest for 30-60 seconds. I used an interval timer and set it to 9 rounds of 30 seconds of work and 0 seconds of rest so that it would just beep every 30 seconds.

Place a resistance band around your lower calf area. I used a long one so I looped it twice before tying. You’ll keep the band in this position throughout the entire workout.

Resistance Band Core Workout

PART 1

Complete three rounds of the following three exercises, doing each for 30 seconds. For this part, you’ll be keeping your legs straight the entire time, pressing them outward against the band. Don’t cheat yourself by not pressing outward! You want to feel your outer thighs and glutes engaged the entire time.

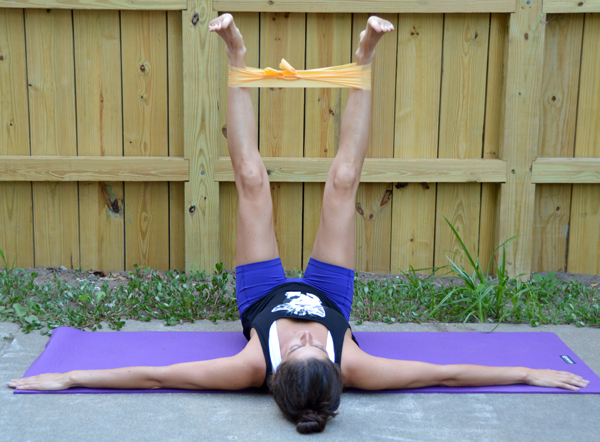
  • Resistance Band Toe Touches: Start laying on your back with arms outstretched overhead, feet straight up in the air, resistance band around your lower calves with your legs spread wide enough apart to engage the outer thighs—you should be pressing hard against the resistance of the band the entire time. From here, crunch up, lifting shoulders off the ground and touching the band or your toes with your hands.
  • Resistance Band Windshield Wipers: Start laying on your back, arms outstretched to either side for support. Legs are lifted straight up with a resistance band around your lower calves. Press your legs out to the sides so that there is tension on the band. You want to press this way throughout the entire exercise—never let the band go slack. From here, lower your legs to the right and then back up and down to the left, back and forth in a windshield wiper motion, twisting through the waist and hips.
  • Resistance Band Leg Lifts: Start laying on your back with your hands underneath your bum for support, resistance band around your lower calves. Spread your legs out to the sides until you feel tension in the resistance band—you want your outer thighs and glutes engaged, pushing hard against that band the entire time. Lift your legs up a couple inches so that they’re hovering straight out over the ground. This is your starting position. From here, lift legs straight up so that they’re perpendicular with the ground (and still pushing out against the band). Lower them back to starting. Your feet should never come to rest on the ground.

PART 2

Complete three rounds of the following three exercises, doing each for 30 seconds.

  • Resistance Band Side Plank Lift Pulses RIGHT: Start in a side plank position, resistance band around your lower calves. Lift the top leg high enough so that there’s tension on the band—don’t let that leg drop below this point the entire time. Press the top leg up against the band, pulsing up continuously while holding the side plank.
  • Resistance Band Frog Stamps: Start in a plank position with your feet spread wide enough apart so that there’s tension on the resistance band (have it around your lower calves). From there, jump your feet up towards your hands and out wide. This will need to be an explosive movement so that you can push against the band while your feet are in the air. You want to land with your feet at least as wide as your hands (preferably wider). Quickly jump them back to starting plank position.
  • Resistance Band Side Plank Lift Pulses LEFT

PART 3

Complete three rounds of the following three exercises, doing each for 30 seconds.

  • Resistance Band Seated Spread Pulses: Start in a seated position with fingertips lightly on the ground by your sides for support. Lean your torso back, core tight (think of pulling your belly button and spine together) and lift your legs about 6” to a foot off the ground, keeping them straight. Resistance band should be around your lower calves. Holding legs at this height the entire time, press your legs out wide to the sides. You want to feel tension in the resistance band the entire time, so legs should stay wide the whole time, pulsing them out to the sides continuously.
  • Resistance Band V-Ups: Start laying on your back, arms reaching overhead, resistance band around your lower calves, and feet spread wide enough apart so that they’re pushing out against the band. Hover feet a couple inches off the ground. This is your starting point. Exhaling and explosively crunching your abs, bring your legs straight up at the same time you lift your torso off the ground, bringing hands to meet your feet, balancing on the tailbone. Release, lowering back to starting point (never let your feet come to rest on the ground). Throughout this crunch, press out with your legs against he resistance band.
  • Resistance Band Boat Pose Spread Pulses: This is just like traditional boat pose, except you’ll be pushing your legs out against the resistance band with little pulses while holding the pose. Start sitting on your tailbone with the resistance band around your lower calves. Lift your legs straight up and wide in a “v” shape. Engaging your core (I think of trying to squeeze my belly button and spine together), hold your arms straight out, parallel to the ground. Hold this pose, and as you do, push your legs out to the sides in little pulses. You always want to feel tension on the band, so never let your legs come together (or close to it). To modify, bend your knees instead of holding legs up straight.

You might recognize the structure of this workout from the 15-Minute Ab Workout I posted last year. It was featured on BuzzFeed and became one of my most popular P&I workouts, so I figured it was worth revisiting! 🙂

Resistance Band Core Workout

WEARING | tank: H&M // shorts: Athleta

P.S. Just to clarify, despite my tank top, I am most definitely not a cat person. Team Dog for life.

xo Nicole