Search Results for: beginner series

12-Minute Bodyweight Tabata Workout Series: Upper Body (Chest, Arms, Core)

12-Minute Tabata Workout: 3 tabata supersets focusing on upper body - no equipment needed!

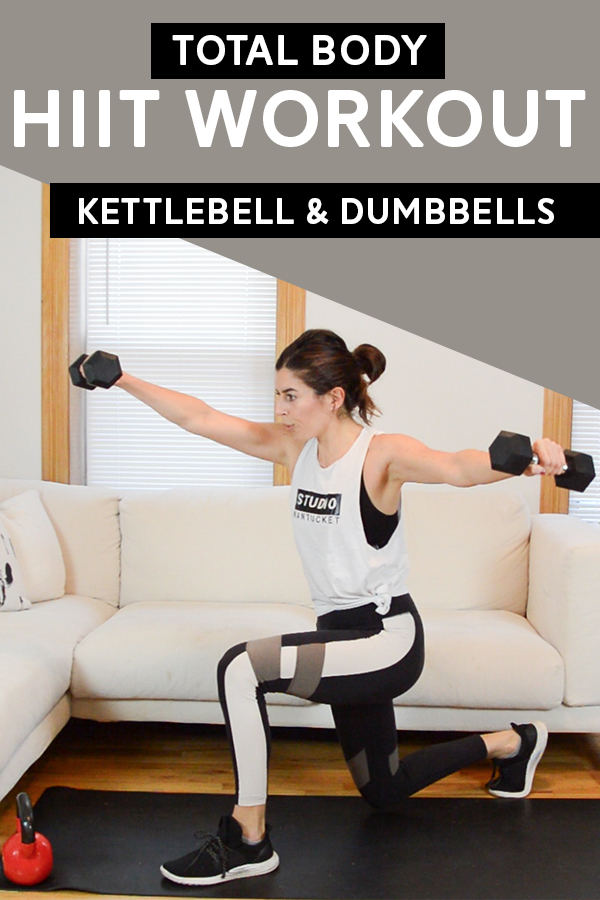
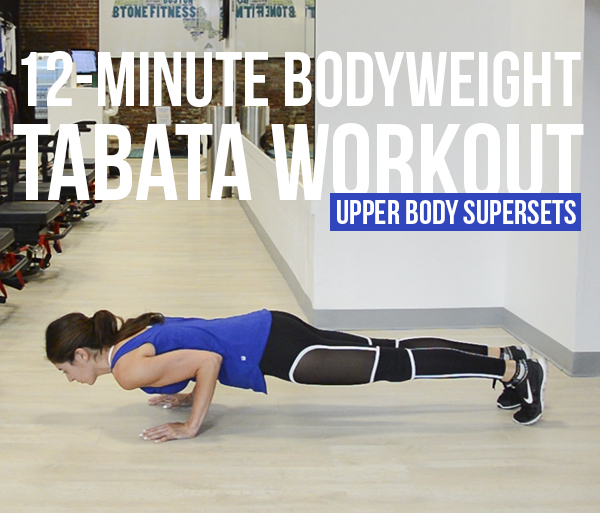
Today’s is upper-body focused, but you’ll get a good dose of core and cardio work as well.

12-Minute Bodyweight Tabata Workout Series: Upper Body (Chest, Arms, Core)


This workout is made up of three tabata supersets. For each tabata superset, set an interval timer for 8 rounds of 20 seconds of work and 10 seconds of rest. During the work intervals, you’ll alternate between the two exercises. In other words: 20 seconds Exercise 1 / 10 seconds rest / 20 seconds Exercise 2 / 10 seconds rest and so on. Rest as needed between tabata supersets, but try to limit it to 60 seconds if possible.
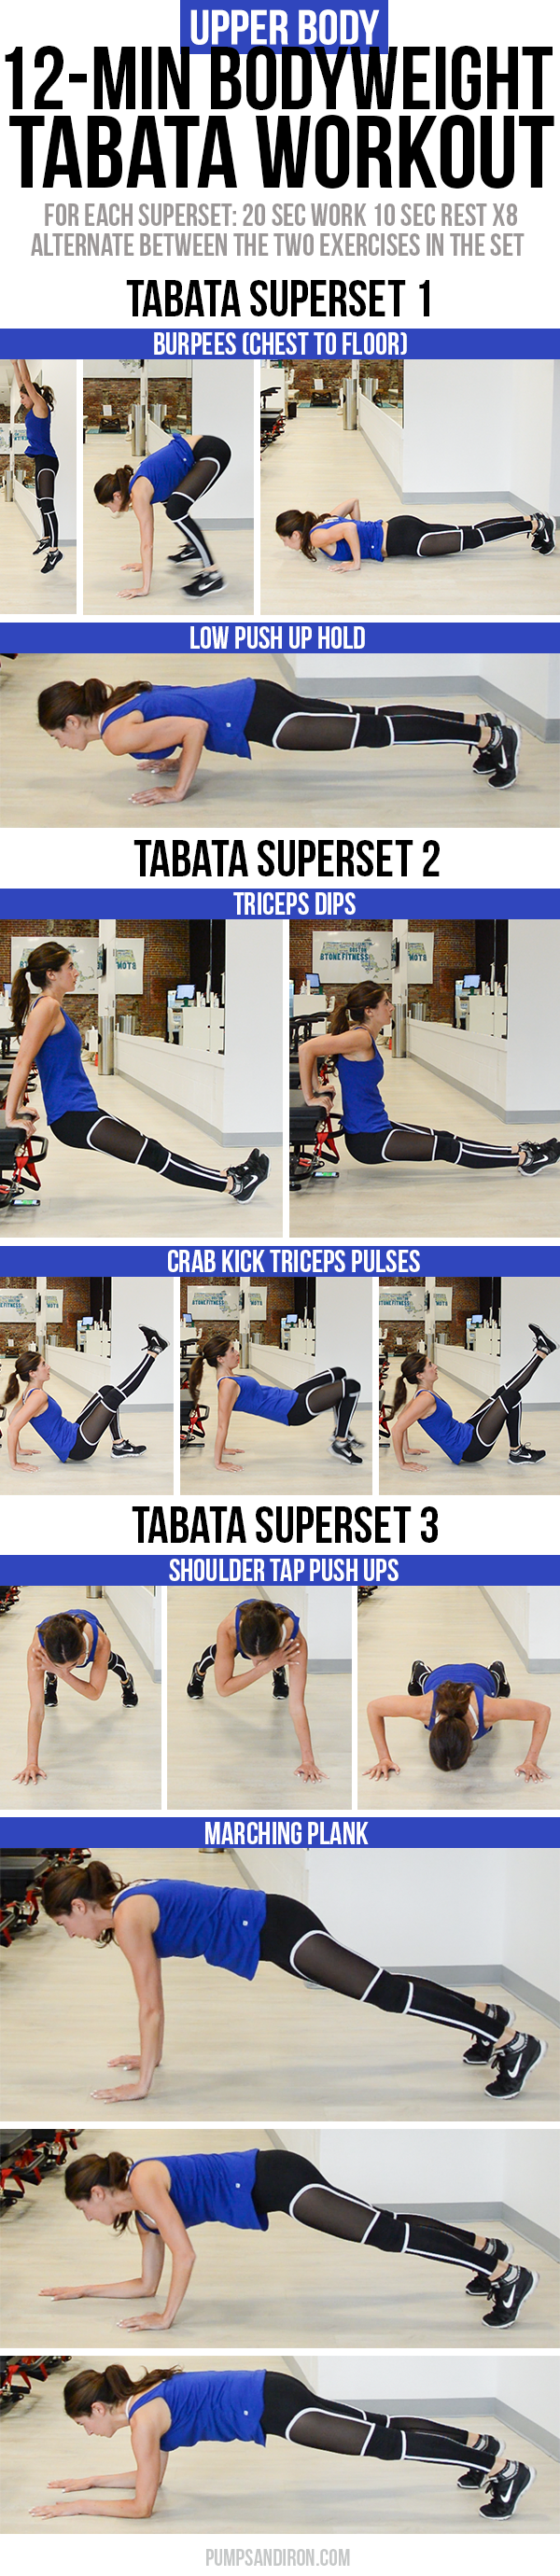
 12-Minute Tabata Workout: 3 tabata supersets focusing on upper body - no equipment needed!

Tabata Superset 1

Chest-to-Floor Burpees | Squat down, bringing your hands to the floor. As you do, hop your feet back out in a plank position, simultaneously lowering your chest to the floor with control (like a push up all the way down). Press yourself back up to straight arms, jumping your feet forward back to squat and then jumping straight up overhead.

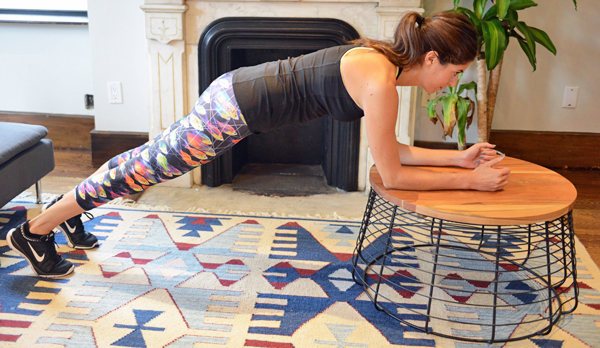
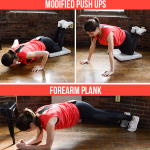
Low Push Up Hold | For this, I want your hands close into the sides of your body (tricep push up). To get into the hold with proper alignment, start in a plank position with your hands stacked underneath your shoulders. From here, roll forward slightly onto your toes so that your hands are now a little further back, aligned with your ribs (this will allow you to bend elbows to 90 degrees). Keeping your elbows close to your body, lower down to a low push up position and hold there with your body hovering off the ground, abs held in tight.

Modify by holding the push up from your knees. Just make sure your hips are still lowered so that your butt isn’t sticking up into the air. Think of lowering from your knees rather than your hips to achieve this.

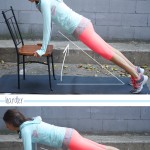
I’m going to call myself out a little on these as it’s a good demo of what not to do with form. Notice the difference in shoulder height between the first five seconds of the hold and the last five seconds: low-push-up-hold

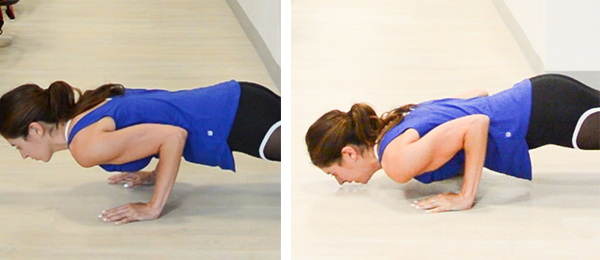
As my arms fatigue, I’m compensating by sinking into my shoulders. Don’t do this. If you notice your shoulders start to dip down (usually accompanied by your bum sticking up into the air), just modify the hold with proper form from your knees. 🙂

Tabata Superset 2

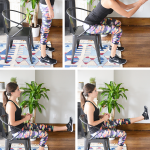
Triceps Dips | Use a chair, coffee table or bench for these. Start with your hands gripping the edge of a chair (bench, etc.) and your legs outstretched with your heels on the ground. Keeping your bum and back close to the edge of the chair, bend your elbows to 90 degrees as you lower your body towards the ground. Make sure your elbows don’t bow out in a diamond shape as you lower. From the bottom, press through your hands to straighten your arms back to the starting position. Imagine there’s a heavy weight sitting in your lap as you do these—don’t trust up through the hips and legs to rise up; use your arms! You’ll do three like this and on the fourth, lower down and hold at the bottom for about three seconds before starting back at the top. Beginners: To make these easier, bend your knees and keep your feet flat on the ground.

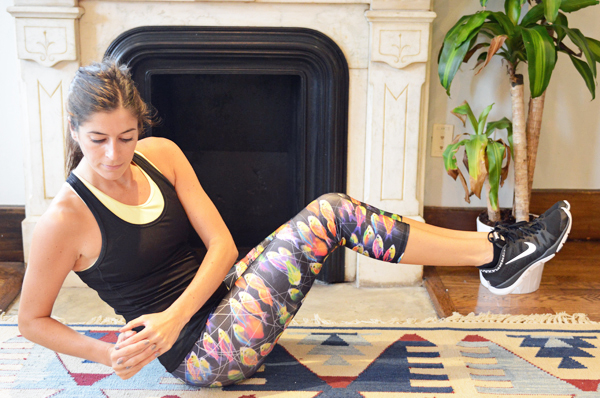
Alternating Crab Kicks with Triceps Pulse | Start in a crab position: feet on ground, knees bent, hands on ground underneath your shoulders, body facing upwards. Lift one foot into the air, straightening that leg. This is your starting position. From here, you’re going to alternate kicking one leg into the air and then the next, switching feet in midair so that there’s never more than one foot on the ground at a time. Your whole body will be working during these but focus on the softening of the elbows (like a triceps dip pulse) as you prep for the jump kick. Push through the hands, thrusting the pelvis upward as you straighten the arms and switch feet midair before landing.

Tabata Superset 3

Shoulder Tap Push Ups | Start in a plank position. I’m doing these with my hands slightly wider than shoulder-width apart because my triceps were fried after tabata set 2! 🙂 Keeping your hips level to the floor, tap your left shoulder with your right hand then the right shoulder with your left hand. Do a push up. To modify, perform from your knees.

Marching Plank | You’re essentially just moving from low plank to high plank, up and down. Starting in a forearm plank position, press up into a high plank, one hand at a time. Reverse the movement when you’re in a high plank, lowering onto one forearm at a time. Important form notes:

  • Hands under shoulders, not in front. As you do these, think about keeping your shoulders stacked directly over whatever joint is on the floor (wrist in high plank, elbow in forearm plank). As you fatigue, the tendency is to have your hands far in front of your shoulders so that it’s easier to get back down to your forearms—don’t do this!
  • Hold your hips level. Instead of shifting your body weight and rocking the hips to the forearm side as you move up and down, stabilize through the core and hold the hips level. To do this, the arms need to work harder, elbows bending deeper (like when you do a push up).
  • Alternate your lead hand. Your body will want your dominate side to lead on this (from forearm plank: right hand presses up, left hand comes up, right forearm lowers down, left forearm comes down). Switch it up next time through so that your left side then leads the way.

workout-outfit-ootd

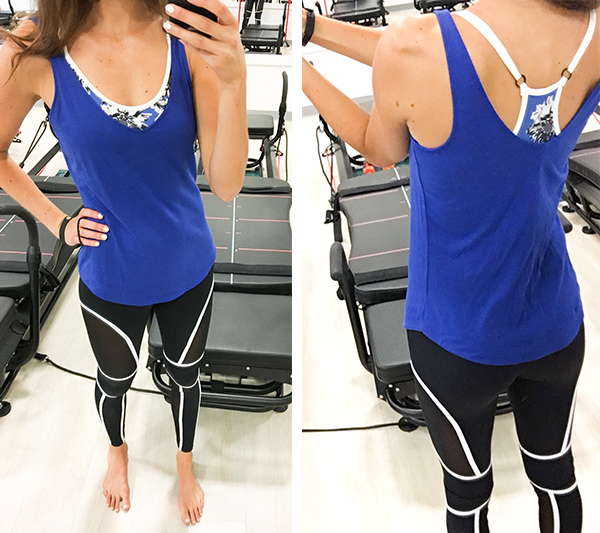
WEARING | leggings c/o Tully Lou // tank c/o Fabletics //  bra c/o PRISM Sport (use code ACTPERRY to get 30% off)

Enjoy! Phew this one was tough for me. My upper body is definitely weaker than my low body and core so this was a challenge!

signature

Beginner Core Workout (Emphasis on Obliques)

beginner-core-workout-at-homeChronic back pain, poor posture, improper form when doing low-body and arm exercises—all can be improved by strengthening your core. This workout would be a great one to combine with a longer cardio session or to do on a more restful day before/after a yoga class. I mean to imply that it’s easy; it’s simply quick and targeted.

Just like last week’s workout in the beginner series, don’t count it out if you’re a little more advanced. Just as there are always ways to modify exercises, there are also ways to advance them.

IMPORTANT NOTE: While this workout was originally published in 2015, I went back and shot a video for it in 2018. In the video, I decided to use longer interval lengths to give me a little more time to give verbal form cues. Same exercises, same everything else—we’ll just use intervals of 40 seconds of work and 20 seconds of recovery in the video instead of the 30/15 structure mentioned below.

Beginner Core Workout (Emphasis on Obliques)


Equipment I Used:

  • One medium weight (I would suggest 8-10lbs for true beginners, but use a weight that challenges you!)
  • Gymboss Interval Timer (there are lots of interval timer apps available for smart phones, too!)
  • Exercise mat

Set an interval timer for 20 rounds of 30 seconds of work and 15 seconds of rest. You’ll go through the following circuit of five exercises four times. Focus on one side of your body per round. In other words, your first time through the circuit, every exercise should be done on the right side. The second time through, do them all on the left. The only exception to this is the russian twist, which will target both sides of your body every time you preform it. Beginner Core Workout (emphasis on obliques) - this will take you just 15 minutes and includes detailed exercise descriptions with ways to modify and advance each move

Standing Side Bend

Stand with feet hip distance apart and a weight in one hand, other hand on hip. I typically use a 25-lb kettlebell for these. A 10-lb dumbbell is a great place to start, and for true beginners, you might even want to start lighter. Lean over to the side with your torso as you lower the weight towards the ground (try to get it at least to knee height, if not a little lower). Engaging the obliques, bring your torso back upright to starting position once you’ve gone as low as possible. That’s one rep.

Make sure that you’re bending to the side—not leaning forward or backward at an angle as you dip. Envision sliding the weight down the side of your leg to keep this alignment.

MAKE IT EASIER

  • Use less weight.
  • Perform the move seated, on either a bench or chair without arms.

MAKE IT HARDER

  • Use a heavier weight.
  • Extend the other hand overhead as you bend to the side.

Beginner Core Workout (emphasis on obliques) - this will take you just 15 minutes and includes detailed exercise descriptions with ways to modify and advance each move

Standing Bicycle Crunches

Start standing with feet hip’s width apart, one hand on your hip and the other lightly behind your head. Don’t pull on the back of your head; keep your chest open, roll the shoulderblade back and down and squeeze your upper back to maintain this wide elbow placement. From this starting position, your going to crunch that elbow down and across your body to touch the opposite knee, which you’ll bend and lift up towards it, squeezing your low abs. Don’t worry if you can’t make physical contact between the knee and elbow; focus on pulling you core in tight (like someone is punching you in the stomach) and just get them as close as possible. Carefully return to your starting position. That’s one rep.

MAKE IT EASIER

  • This one requires balance. If it’s too much, hold onto something with your bottom, non-crunching hand to steady yourself as you perform the exercise.

Beginner Core Workout (emphasis on obliques) - this will take you just 15 minutes and includes detailed exercise descriptions with ways to modify and advance each move

MAKE IT HARDER

  • Do it laying on the floor. Lay on your back like a traditional bicycle crunch, peeling your shoulders off the ground as you crunch up to meet the opposite knee. If you take this advancement, still crunch to the same side during a 30-sec work period, alternating each time through the circuit.

Tabletop Bird Dog Crunch

Start in a kneeling tabletop position with hands stacked directly under shoulders and knees under hips. Contract your abs to stabilize you as you outstretch your right arm in front of you and your left leg straight behind you. The extended limbs should be level with your hips/shoulders. This is your starting position. From here, bend the extended limbs, crunching the elbow in towards the knee. As you do this crunch, picture someone punching you in the stomach—contract the abs and round the spine up towards the ceiling, pulling the core in tight. Return to starting position, extending the right arm and left leg back out. That’s one rep.

Important form focus: Pay attention to your back—it should never sag down toward the ground. Look in a mirror when you’re in tabletop with your leg and opposite arm outstretched. Does your back look like a hammock hanging between your bum and shoulders? That’s not what you want; it probably means you aren’t engaging your abs. Think of pulling your bellybutton in towards your spine. Aside from the natural curvature of the spine, your back should be flat while in this starting position.

MAKE IT EASIER

  • Keep both hands on the ground. If you’re feeling too wobbly during the move, keep both hands planted firmly on the floor and just focus on crunching the knee in as you squeeze your abs.
  • You’ll notice this is a recurring modification: If floor exercises don’t work for you because of limited mobility, bring the “floor” up to you. Instead of being on all fours, find a plank position on an elevated surface (bench, coffee table, etc.). Perform your crunches from here, possibly just crunching the knees in one at a time if incorporating the upper body isn’t working.

Beginner Core Workout (emphasis on obliques) - this will take you just 15 minutes and includes detailed exercise descriptions with ways to modify and advance each move

MAKE IT HARDER

  • Hover your knee. Instead of having your non-crunching knee on the ground, plant the ball of that foot onto the floor and lift the knee up a couple inches so that it’s hovering (otherwise your body is in the exact same position). You’ll feel that quad start to burn as it works to stabilize you through the crunches.
  • Do it in a plank. Instead of having your knees on the ground, hold a full plank position (balls of feet on the floor) as you crunch opposite knee to elbow.

Kneeling Side Forearm Plank Hip Lifts

Laying on your right side on the floor, plant your right forearm on the ground with the elbow stacked directly under the shoulder. Stack your left knee on top of the right. From here, contract your right sidebody as you lift your hips off the ground so that your bottom knee and forearm are now your points of contact with the floor. Pause at the top, really squeezing into the sidebody and pressing the hips as high as they’ll go. Slowly lower the hips back down to the ground. That’s one rep. 

MAKE IT EASIER

  • If limited mobility prevents you from doing floor exercises, put your bottom forearm on an elevated surface (bench, table) instead (feet will be on the floor instead of knees if you take this modification). From this incline side plank position, lift and lower your hips.

MAKE IT HARDER

  • Don’t rest your hips on the ground at the end of each rep. Lower them to a hover then contract the obliques to lift ‘em right back up.
  • Do it from your feet. Instead of having your knees be the point of contact with the floor, do these in a full plank position, feet stacked on the floor.

Beginner Core Workout (emphasis on obliques) - this will take you just 15 minutes and includes detailed exercise descriptions with ways to modify and advance each move

Russian Twists

Start seated with knees bent and heels planted on the ground. Lean back slightly (don’t slouch, keep your chest open) until you feel your abs sort of kick in and start working to support the angle of your torso. From this starting position, twist to one side, bringing your hands to the outer side of that hip; then repeat in the other direction. That’s one rep. Really twist at the waist—you want your chest to be totally facing whatever side you’re bringing your hands.

MAKE IT EASIER

  • Sit in a chair instead of on the floor. If you have limited mobility, getting all the way down to the floor for exercises can be really challenging. Don’t let that discourage you! Bring the “floor” up to you. Sit in a chair without arms and scoot forward enough on the seat so that you can still lean back slightly with your torso. Twist side to side from here. Since this will be easier than the floor, maybe you try holding a weight while you twist to keep the challenge. 

MAKE IT HARDER

  • Hold a weight in your hands as you do this.
  • Lift your feet off the ground. Instead of having your heels down for support, balance on your tailbone, hovering the feet off the floor as you twist side to side.

beBeginner Core Workout (emphasis on obliques) - this will take you just 15 minutes and includes detailed exercise descriptions with ways to modify and advance each moveginner-core-workout-5

The “Why” Behind This Workout

A strong core makes for a strong body. As your core strength improves, you’ll notice that you’re better able to perform low body and upper body exercises with proper form. So much of our ability to balance and move with coordination comes from having a strong core—after all, it’s where all our limbs are attached!

Speaking of this powerhouse muscle group …

It’s important to train all sides of your core, not just the “six pack.” Your core includes your obliques, back and all the connecting muscles. It’s important to move away from crunches and make sure you’re working your sides and backside in addition to the front. Think of your core as a girdle: If only the front side is strong, it’s not very effective at holding everything in, now is it?

Focusing on one side at a time is a challenging and effective way to train. By spending an entire circuit on the right sidebody before doing the whole circuit on the left will effectively work the targeted muscle group to its point of exhaustion. It’s the methodology used in Lagree Fitness (the megaformer class I teach), and I find it to be so effective and challenging.

Moving gradually from standing to floor moves makes the transitions easier for people with joint issues or who are carrying a significant amount of extra bodyweight. While some of these exercises are done on the floor, I’ve included modifications for staying a little higher up for all. One of the biggest challenges a beginner may face is all the fast position changes that often come with workouts: hopping from laying on your stomach to your feet; jumping from plank to a squat; getting up and down from the floor—it’s not always very joint friendly. This workout moves from standing, gradually down to the floor so that you only have to get down (and then back up) once per circuit round.

Beginner Core Workout (emphasis on obliques) - this will take you just 15 minutes and includes detailed exercise descriptions with ways to modify and advance each move

Shot in a Breather room (Gloucester St. #2) — I always get lots of questions about where the decor is from and unfortunately have no clue (although I wish this was my apartment haha). You can get a $45 credit on your first Breather booking with code PUMPIRON (they’re in NYC, Boston, San Fran, Montreal & Ottawa).

As always, let me know if you have any questions on form in the comments! I’ll do my best to answer quickly.

MORE RESOUCES FOR BEGINNERS: 

xo Nicole

Total Body HIIT Workout (Kettlebell + Dumbbells)

Total Body HIIT Workout (Kettlebell + Dumbbells) - This total body hiit workout will take you 22 minutes to complete. Video included so you can follow along at home or the gym! #hiit #intervaltraining #hiitworkout #workout #athomeworkout

You all seem to be loving this structure, so I’ve got another total body hiit workout for you! You’ll need a kettlebell and a set of dumbbells for this one. And if you missed the others in this series:

Total Body HIIT Workout

EQUIPMENT I USED

  • Kettlebell. Use whatever weight you normally swing.
  • Set of medium dumbbells. These are going to mainly be for shoulder exercises, so you might want to go a little lighter than your normal “medium.” I’m using a set of 8lb weights

This totaly body hiit workout is broken up into three mini circuits. In each circuit, you’ll do three exercises, three times through, using an interval structure of 30 seconds of work and 10 seconds of rest. After each set, rest for 30 seconds. After each circuit, rest for 60 seconds.

As with all workouts, you want to make sure you’re properly warmed up beforehand. Always listen to your body, modifying or stopping as needed. I have two warm ups on my channel or you can do your own.

I also have a guided cool down on my channel that I highly recommend post-workout.

Total Body HIIT Workout (Kettlebell + Dumbbells) - This total body hiit workout will take you 22 minutes to complete. Video included so you can follow along at home or the gym! #hiit #intervaltraining #hiitworkout #workout #athomeworkout

Workout Breakdown

See the times for a preview of each exercise and how to modify.

Circuit 1 (01:34)

  • High Pull Squat Jump
  • Low Squat Figure 8
  • Kettlebell Swings

Circuit 2 (09:17)

  • Curl, Raise, Rotate, Press
  • Squat Jump Press x2
  • Back Lunge with Front/Lateral Raise

Circuit 3 (16:50)

  • Hollow Hold, Sit Up Twist
  • Sprawl Sumo Squat
  • Push Press Jumping Jacks

Hope you enjoy this total body hiit workout! Next week I’m going to share a beginner-friendly workout using this same structure. And if you haven’t already, be sure to subscribe to my YouTube channel. 🙂

xo Nicole​​​​​​​​​​​​​​

Links to equipment are affiliate.