This post is sponsored by Wonderful Pistachios. All opinions—as always!—are my own. I appreciate your support of the brands that make this blog possible. 🙂
When it comes to staying healthy at work, I realize I have an advantage. In many ways, being healthy is my work. Teaching group fitness keeps me active, and when I’m not doing that I have the flexibility to work from home (or anywhere) and schedule my own workouts whenever is best that day.
The irony of being in the fitness industry, however, is that as you spend more and more time helping others get their workouts in, you have less and less time for your own. There was a time when I was teaching way too many classes a week and I found myself exhausted and completely run down. Now I know my teaching limit and stick to it, but back then I’d find myself without the energy to do my own workouts. And the more tired I became, the more I craved sugar and caffeine. I had overextended myself and was becoming less fit.
Another challenge for me that comes with working from home is the snacking. My desk is five steps from my kitchen and my go-to method of procrastination has always been eating (I go HAM on the snacks when I have a blogging deadline haha). My refrigerator and pantry are full of healthy foods so it’s not that what I’m snacking on is a big deal, it’s just the amount. If I have a family-size bag of trail mix in front of me, for example, I’ll absentmindedly eat the whole thing by the handful while answering emails. Oopsies.
For this reason, when I have a heavy work load, I’m all about keeping snacks around that aren’t as easy to eat mindlessly. It sounds silly, but if I have to work a little harder for it, it slows me down and forces me to really focus and enjoy the food. Oranges (pause and peel), cherries (spit out the pits), and pistachios (crack open each shell) are among my favorites.
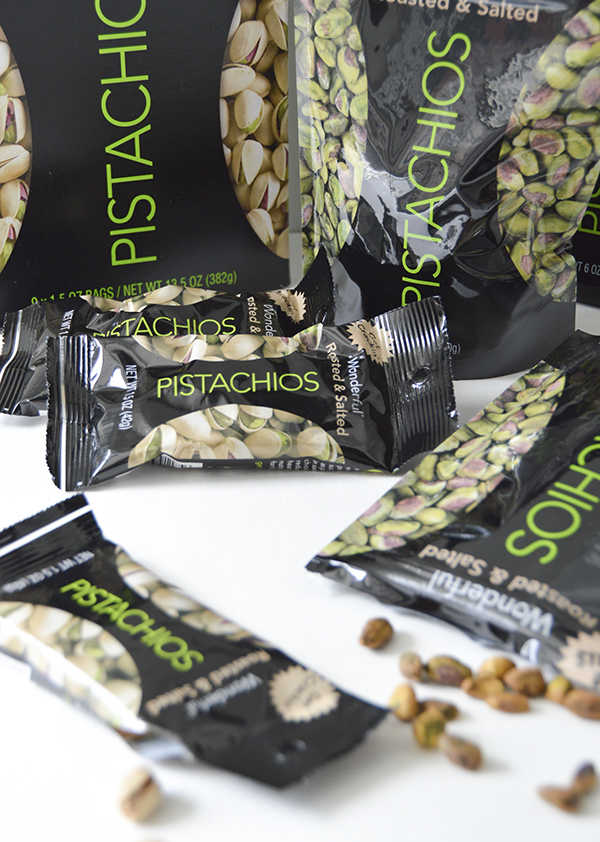
Wonderful Pistachios, The Mindful Nut, are one of the highest-protein, highest-fiber nuts around. They’re also one of the lowest-fat and lowest-calorie nuts (which is why they also call it The Fit Nut),, making them a great alternative to snacks high in added sugars and saturated fat (almost 90% of the fat found in pistachios is unsaturated). I love the shelled packs so I don’t rush through my snack, but they also come in a no-shells variety which is great if you want to use them as a salad topper without having to remove shells.
Wonderful Pistachios has a giveaway and coupon for you guys (scroll down), but before I get to that, I thought it’d be fun to share some exercises you can do with a desk chair—in case snacking healthy at work isn’t enough for you. 😉
10 Exercises You Can Do with a Desk Chair
You don’t necessarily have to do these at your desk (if you have cube mates that might elicit a few stares), but these are a few of my favorite exercises using a chair.

Try picking five of the above exercises and performing them in a circuit: 45 seconds of work / 15 seconds of rest. Complete the circuit two – four times for a quick office (or at-home!) workout.
#WorkSmartSnackSmart Giveaway
Wonderful Pistachios wants to see how you Snack Smarter at work. All you have to do to enter is post a photo on Instagram of your healthy workspace and include the hashtags #WorkSmartSnackSmart and #WPGiveaway and tag @GetCrackin.
Ten randomly selected winners will get a case of No Shells Roasted & Salted Wonderful Pistachios Shelled, Roasted and Salted and a case of the Roasted & Salted Wonderful Pistachios Multipack, Roasted and Salted. One grand prize winner will get an office refresh complete with Wonderful Pistachios and other Wonderful products for a full year and a custom Wonderful Pistachios branded refrigerator. Full contest terms here.
If you don’t win, you can still save with the discount code 20SNCKSMRT9. That will get you 20% off either 32oz Roasted Salted Wonderful Pistachios or 6oz shelled Wonderful Pistachios through 7/28. Promo code valid while supplies last.
What’s your favorite workday snack?

This is a sponsored conversation written by me on behalf of Wonderful Pistachios. The opinions and text are all mine.


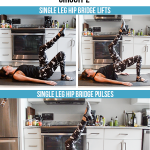
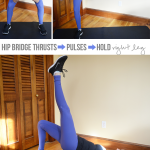
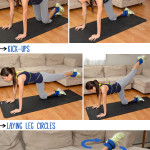
 I see this one most frequently if there’s an ankle weight or other resistance (bungee cord, etc.) on the moving leg/foot. You want to keep both hip bones the same distance from the floor (again, in most tabletop exercises, not all). Try not to roll the target hip open or let it drop down to the floor. Keeping your core and the supporting side glutes engaged will help with this.
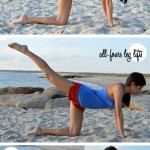