Tempo Change Core Workout

Tempo Change Core Workout - alternate between a slow and fast paceThere are lots of ways to change how an exercise feels. I’ve talked a bit on the blog about range of motion (this movement pyramid workout is a good example), but another great way to switch it up is to vary your speed. I was always of the opinion that faster = harder … until I tried a Lagree Fitness class. One isn’t necessarily better than the other–it just depends on the goal. Different speeds require our muscles to activate in different ways.

I love including both types of training in my weekly routine–a slow Btone class one day and then an explosive HIIT bootcamp workout the next. They’re different ways to challenge your body. Today’s quick workout is made up of some basic core moves that you’ll preform slowly at first and then as fast as possible. Pay attention to how the tempo changes the way the exercise feels. Going faster is more of a cardio challenge, but a full range of motion can be more challenging when you slow it down.

Tempo Change Core Workout

Equipment I Used:

  • Exercise mat
  • Gymboss Interval Timer

You’ll spend a minute on each exercise. 20 seconds slow, 10 seconds as fast as possible, and repeat. Move immediately on to the next exercise without resting. I set my interval timer for 22 rounds of 20 seconds of work and 10 seconds of rest to time the workout. Once you complete all 11 exercises, rest for 30-60 seconds and then go through once more for a total of two times through. If you’re a beginner or want a shorter core blast, just go through once.

Slow should NOT mean easy. When you’re performing the exercise slowly, I want you to be super deliberate in your movements. Think of adding in a “squeeze” or pause at the top of each muscle contraction. For example, on the side plank hip dips, as you lift your hips slowly back up to plank, really squeeze the oblique at the top, pressing your hips that extra inch upwards. Tempo Change Core Workout - alternate between a slow and fast pace

  • Push Ups | Feel free to modify from your knees if necessary!
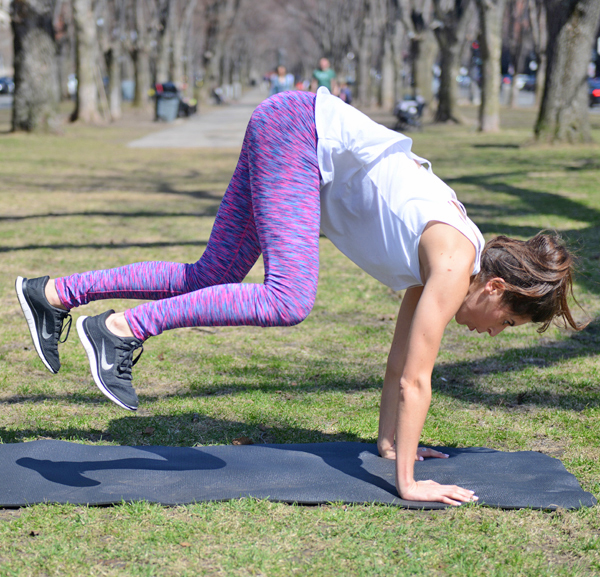
  • Crossbody Mountain Climbers | Start in a plank position with hands stacked under shoulders, abs held in tight (don’t let your low back arch down towards the floor). Pull your right knee across your body towards your left elbow, trying to make contact between the two if you can. Step the right foot back into your high plank and then repeat on the other side, left knee to right elbow. Especially when going slowly, I want you to try to physically tap the arm with your knee every time.
  • Superman Lifts | Start laying on your stomach, arms stretched overhead. From here, squeeze the shoulder blades, back and glutes to lift your arms and legs off the ground as high as you can. Pause for a second at the top, and then slowly lower extremities back down to starting position. For more of a challenge, don’t let your arms and legs ever come fully to rest on the ground; lower to a hover and then lift back up.
  • Rolling Sit Ups | Think Pilates C curve; think “tucking” at your favorite barre class. Start laying on your back with your knees bent and feet firmly planted on the ground, arms outstretched. You’re going to a do a sit up, keeping your feet on the ground and rolling up, vertebrae by vertebrae, keeping your low back glued to the ground until the last few inches of your sit up. Reverse the motion once you’ve reached the top, pulling the low abs in tight as you roll first your low back and then mid and upper back down to the floor. Try not to tuck your chin into your neck as you do this.
  • Bicycle Crunches | Start laying on your back, hands behind your head (but not pulling on your head) and legs extended straight out, hovering off the floor a couple inches. From here, bend your left knee in, keeping the right leg extended out straight, and crunch your upper back up off the floor, twisting the right elbow across your body to meet the left knee. Repeat to the other side, fluidly moving from one side to the next, legs alternating in a pedaling motion.
  • Leg Scissors | Lay on your back with hands under your butt for support or by your sides. Straighten your legs, lifting the left leg a couple inches off the ground to a hover and the right leg straight up in the air, perpendicular to the ground. You’re going to alternate leg positions, lifting and lowering them back and forward. The goal is to never rest the bottom leg on the ground; only lower it to a hover. As you do these, pull your abs in tight and press your low back to the ground. If you feel your low back lifting off the floor and straining in anyway, add a bend to your knees as you do these.
  • Leg Lifts | Lay on your back with hands under your butt for support or by your sides. Lift legs straight up, perpendicular to the ground and then lower until they are just a couple inches off the ground. Legs should stay straight the whole time, and should never come to rest on the ground in between reps. As you do these, pull your abs in tight and press your low back to the ground. If you feel your low back lifting off the floor and straining in anyway, add a bend to your knees as you do these.
  • Side Plank Hip Dips (Right) | Start in a side plank position, right hand stacked under right shoulder. From here, dip your hips down towards the ground and then squeeze your right sidebody to lift them back up to starting position.
  • Side Plank Hip Dips (Left)
  • Side Plank Leg Lifts (Right) | Start in a side plank position, right hand stacked under right shoulder. From here, lift your top, left leg straight up and then back down to starting position. For more of a challenge, never let that top leg rest on the bottom one; lower it to a hover and then lift back up. With this one, you’re using your oblique to keep the hips lifted and using your side butt to do the leg abductions. If your wrists bother you, you can do this one from your forearm.
  • Side Plank Leg Lifts (Left)

Tempo Change Core Workout - alternate between a slow and fast paceWEARING | bra: Fabletics // tank: c/o Marshalls // leggings: c/o Puma //sneakers: c/o New Balance

signature SHOP A SIMILAR LOOK:

Sweaty HIIT Circuit Workout

Sweaty HIIT Circuit WorkoutHello from Miami! I’m wrapping up my friend’s bachelorette weekend, so while I do the complete opposite of working out (read: drink alcohol by the pool), let’s focus on healthier times today… :)

I had my Btone clients do this HIIT workout the other week as the bootcamp portion of the Tone ‘N Torch class I teach and everyone was good and sweaty by the end–a beautiful sight to a fitness instructor’s eyes! Lots of jumpin’ around in this one. If you want a strength training workout that also packs a cardio punch, this one will get your heart rate up in no time.

Sweaty HIIT Circuit Workout

Equipment I Used:

  • Set of 10-lb dumbbells (optional—you can do the workout without them)
  • Gymboss Interval Timer
  • Exercise mat

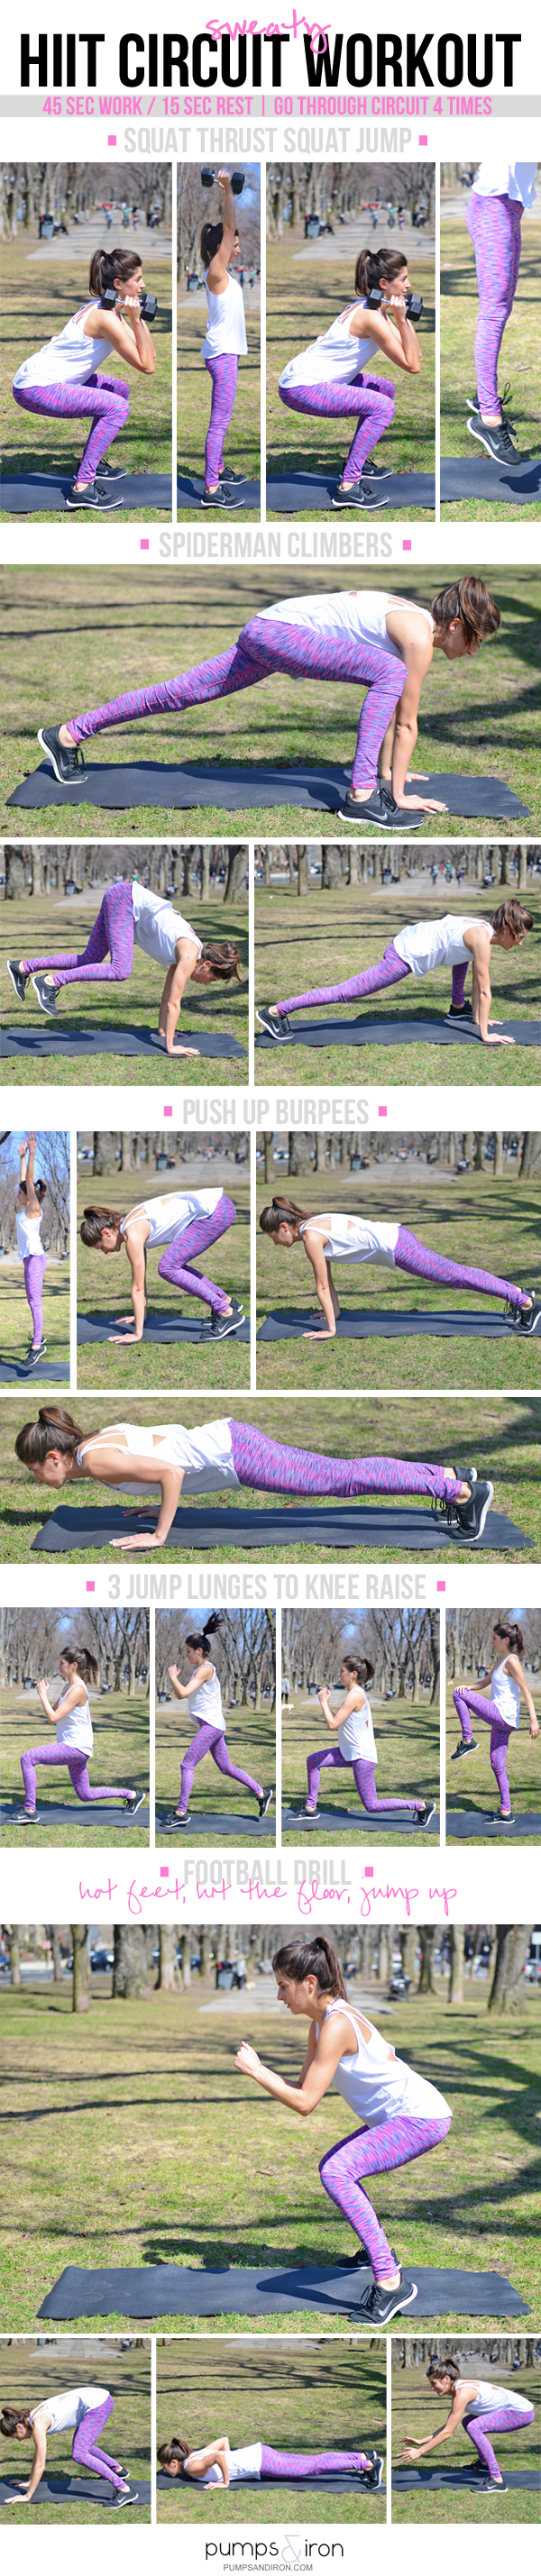
Set an interval timer for 20 rounds of 45 seconds of work and 15 seconds of rest. You’ll go through the circuit of five exercises four times. During the 45-second work interval, your goal is to get in as many reps as possible without sacrificing form. Sweaty HIIT Circuit Workout

Squat Thrust Squat Jump | You do a squat thrust then a squat jump, alternating between the two. Hold the dumbbells at shoulder height, feet about hip’s width apart and squat down, keeping your lower abdomen held in and sliding your bum and hips back and down. Once you reach your lowest squat, power up, driving your hips forward and engaging the glutes as you straighten your legs to stand. As you do so, press the dumbbells overhead into a shoulder press. Sink back down into your low squat. Next time you power up, keep the dumbbells at shoulder height as you jump up, landing softly back down into your squat position. Go right into your thrust, continuing to alternate between the two.

Spiderman Climbers | Start in a plank-lunge position with the right foot planted on the floor on the outside of the right hand. Jump both feet up, momentarily shifting all your weight into the hands, and land back in a plank with the left foot outside the left hand. Continue alternating back and forth. Beginners: instead of jumping, step your right foot up towards the right hand, step it back to plank, then repeat on the left.

Push Up Burpees | Start standing, feet about shoulder-width apart. Squat down, bringing your hands to the ground by your feet and jump both feet back into a plank position. Do a push up. Quickly jump your feet back up by your hands and shift the weight into your feet, bring torso upright into a low squat position. From here, jump up, arms overhead. Land softly on your feet, sinking right back down into a squat and starting from the top.

Jump Lunges to Knee Up | You’ll do three jump lunges then a knee raise. Make sure you do three—the odd number will ensure you’re alternating sides for the knee raise. Start in a split-stance lunge: right foot in front, ball of left foot planted on the floor behind you. Both knees should be bent to 90 degrees, front knee aligned over ankle, back knee hovering just a couple inches off the floor. From here, push off your feet to jump up in the air, switching feet in mid-air and landing back in a lunge with left foot forward and right foot planted behind. That’s one. After you’ve done three, stand up on your front foot, bringing your back knee up into your chest, engaging your abs. Lower the knee, stepping right back into a lunge position. Start your three jump lunges.

Football Drill (Hot Feet to Hit the Floor) | Start with hot feet: You essentially run in place as fast as you can while in a wide-leg squat position. With your feet a bit wider than hip-width apart, squat down. Staying low, you’ll quickly run your feet up and down, staying on the balls of your feet and barely picking them off the floor (an inch or two) so that you can maintain the speed. Every five or so seconds, hit the floor. Jump down into a sort of plank, lowing your chest to the floor. As soon as your chest touches the floor, push back up and explosively hop back to your feet, staying low in a squat position and going right back into hot feet. Sweaty HIIT Circuit Workout

WEARING | top, bra & leggings: Fabletics // sneakers: Nike (similar here)

Enjoy your day!

signature

SHOP A SIMILAR LOOK:

15-Minute Towel (or Slider) Workout

At Home Towel/Slider WorkoutI hope you all had a wonderful weekend! I spent mine up in Maine with my dad relaxing at the house and snowmobiling. It’s so pretty up here!

A photo posted by Nicole Perry (@nicoleperr) on


I have one more towel/slider workout today and then I’ll relax with all these faux-megaformer moves, promise. :)

15-Minute Towel (or Slider) Workout

Equipment I Used:

  • Towel (or sliders if you have them)
  • Exercise mat
  • Gymboss Interval Timer

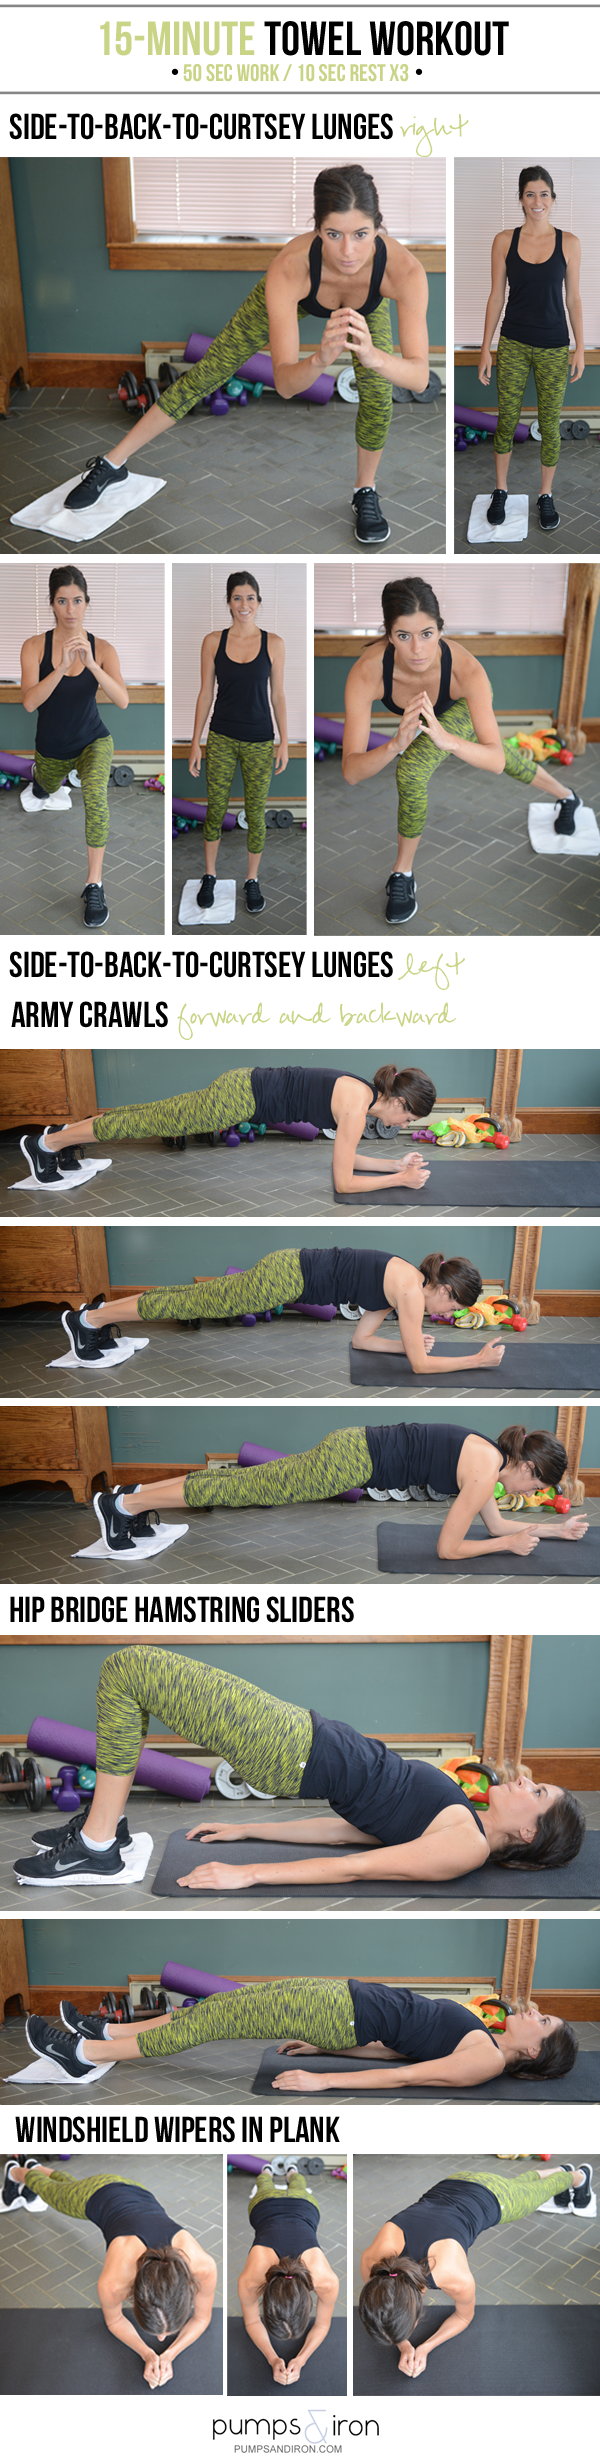
Set a timer for 15 rounds of 50 seconds of work and 10 seconds of rest. I know 10 seconds isn’t very long—it’s basically just giving you enough time to set up for the next exercise. If you’re a beginner, you can change the interval lengths (maybe do 40 seconds of work and 20 seconds of rest). You’ll go through the following five exercises three times. At Home Towel/Slider Workout

Sliding Side-to-Back-to-Curtsey Lunges (Right) |

Your right leg will be the base leg; the towel will go under your left foot. Starting in a standing position, slide the left leg straight out to the left, bending your right knee down into a side lunge. Press through the right heel to come back up to standing and then transition smoothly into a back lunge, sliding the left foot back behind you as you bend the right knee. Again, press through that right heel to rise back up to standing and then slide the left foot to the right, shooting the left leg behind the right foot as you bend the right knee down into a curtsey lunge. Press back to standing and start from the top of the sequence.

Form cues to keep in mind:

  • The right knee should never stick out farther than the toes. To achieve this, think of sitting your hips and bum back into the lunges as you lower.
  • At the top of each lunge (when you’re standing), try not to lock your right knee straight. Keep a soft micro bend in it so that the muscles are still working (rather than shifting your bodyweight into a locked joint).
  • Keep your bodyweight in the right heel. The left foot is supporting little—if any—of your bodyweight.

Siding Side-to-Back-to-Curtsey Lunges (Left) |

Army Crawls |

These are fun! Well…”fun”. You know what I mean. :) The move is called Lizard in Lagree Fitness and it’s the feet that stay still while you move the carriage with your forearms (everyone loves to hate this move). Off the machine, put your feet on a towel and get into a plank with your forearms at the end of an exercise mat. Army crawl your way up the length of the mat, one forearm in front of the other, maintaining the plank position as you slide forward. When you can no longer go any farther forward, reverse the motion, crawling your forearms backward towards the starting edge of the mat. As you move, try to keep your hips level in a plank. They’ll want to dip side to side with each step of the forearms; use your core strength to stabilize them. Beginners: you can do these from your knees, just make sure to add an extra towel for padding.

Hip Bridge Heel Sliders |

Start in a bridge position, feet on a towel stacked underneath your knees, shoulders, neck and head resting on the ground with arms by your side. Squeeze your glutes and core to lift your hips off the ground so that from shoulders to knees is a straight, diagonal line. From this starting position, start to slide your feet out, straightening your legs and rolling onto your heels. Try to keep your butt off the ground, even at your farthest extension. When you’ve gone as low as you can comfortably go, drag your heels inward, coming to a flat foot as you slide your feet back to the starting position. A note about form: This goes for any hip bridge exercise, but especially when you’re adding in these sliding hamstring curls: you don’t want to overextend your low back. It’s the smallest change in position (as you can see below), but think of it as the difference between engaging and not engaging your abs. In the picture to the left, I’m engaging the backside of my body to keep my hips lifted: squeezing my glutes and back, but not activating the front of my core. You can tell by the slight upward arch of my midsection. In the picture to the right, I’ve engaged my whole core, pulling my abs in tight with a slight upward tuck of the pelvis. My low back is not over-stressed, and the top of my body forms a straight diagonal line. Hip Bridge Exercise - tips for proper form Beginners: you can do these from a crab bridge position (think of the crab walk you used to do as a kid). Support yourself on your hands instead of resting shoulders on the floor, keep your hips lifted, and slide the feet out and in from this all-fours position. 

Windshield Wipers in Plank |

Start in a forearm plank position with feet on a towel, shoulders stacked over elbows. From here, you’re going to swish both feet to the left, squeezing the left sidebody. Swish them back to center, then to the right. Continue: left, center, right, center. Maybe my floor just was a little sticky, but these had to be one-part slide, one-part hop for me in order to get a full range of movement. Keep this exercise in mind, too, if you struggle with windshield wipers laying on your back. At Home Towel/Slider Workout - just 15 minutes long!

WEARING | tank & leggings: Fabletics // sneakers: Nike (similar here)

SHOP A SIMILAR LOOK:

 signature