Over the last few weeks, I’ve talked about what essential oils are and what they do, and I’ve given some guidelines for what to look for when choosing an essential oil brand. Today, I want to go over how to store essential oils properly and talk a bit about shelf life. With those basics covered, I think we’re ready to jump into some specific recommendations next week and I’ll go into which essential oils to invest in first. Woop! We’re *almost* to the fun stuff. 😉
How to Store Essential Oils Properly
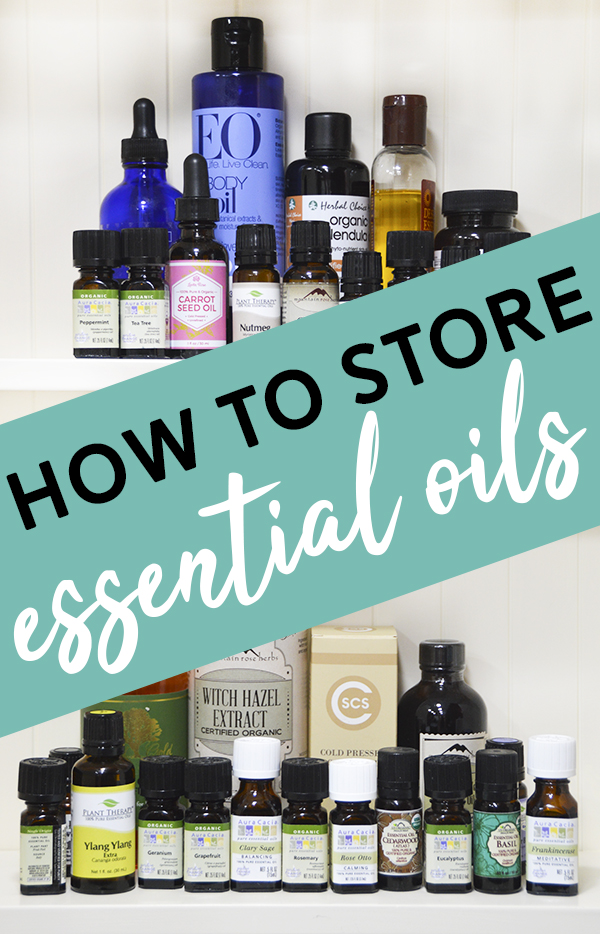
First and foremost, the essential oils you buy should come in dark-colored glass bottles to protect them from light. Typically they’ll be amber or cobalt blue. I’d be wary of any brand selling essential oils in a clear bottle or plastic bottle. (Plastic can be fine for carrier oils, but not essential oils.)
You’ll want to store your oils away from direct sunlight and any heat source. Typically cool, dark cabinets are best. My bathroom is tiny and gets super hot and steamy when the shower runs, so I keep mine in my bedroom. If you don’t have cabinet space, several essential oil suppliers sell wooden boxes with small dividers in them that are perfect for storing small oil bottles. You can also get creative and search Amazon or Etsy for cute nail polish chests/organizers. Most will fit essential oil bottles perfectly (assuming you’re buying small sizes).
Ideally, you don’t want to use rubber stoppers or rubber eye-dropper lids on your essential oil bottles—especially not for long-term storage. Over time, the essential oils will actually soften and destroy the rubber. As you might remember from the first blog post in this EOs 101 series, essential oils are volatile compounds. This means they turn from liquid to gas rapidly at room temperature. It’s that gassing off that causes damage to the rubber.
If you buy essential oils in larger quantities, re-bottle the oils into small glassware when they’re below half-full. The air inside the vacant space encourages oxidation and this will shorten the shelf life of the essential oil. An easier option is to just buy in small amounts so that you’re using the entire bottle within a year or two’s time.
Shelf Life of Essential Oils
If you follow all the above storage guidelines, essential oils are good for an average of 2-5 years. That will vary, however, by type of essential oil. As a general rule of thumb, buy in small batches and replace your essential oils after three years, with some exceptions.
Essential oils with a chemical makeup high in sesquiterpenes and/or sesquiterpenols have the longest shelf life. In fact, the aromatic quality of Patchouli, Vetiver, Sandalwood and Ylang ylang can actually improve with age. That being said, their therapeutic quality can still diminish so it’s best to replace after four years.
Citrus oils are on the other end of the spectrum, and are the quickest to spoil with a typical shelf life of 9 months to 1 year. In general, the more monoterpenes in an essential oil, the shorter the shelf life. When you break down the chemical constituents of most citrus oils, they contain upwards of 90% monoterpenes. Because of this, it’s often recommended you store citrus essential oils in the refrigerator. I go through Lemon really quickly because I love it and am diffusing it so frequently, so I don’t store that one in the fridge. I do store my Grapefruit and Lime in there, as I don’t go through them as fast.
Shelf Life of Carrier Oils & Blends
Up until now we’ve been talking about 100% essential oils. When you add an essential oil to a vegetable/carrier oil, the shelf life will then equal that of the carrier. (For example, adding essential oils to rosehip seed oil to make a nourishing facial oil.) In most cases that means the shelf life is shortened. You can store carriers and blends in the refrigerator to keep them as fresh as possible, but my best recommendation is to just not buy base oils (or essential oils) in bulk. Small quantities for maximum freshness is the way to go.
A great way to slow the rate of oxidization in blends using a carrier oil is to add an antioxidant like Vitamin E. I’ll get into specifics when I start sharing actual recipes with you all, but you can buy Vitamin E gel capsules that you’d take orally as a supplement. Rip the gel open and press the Vitamin E into your facial oil and massage blends. Not only is Vitamin E great for your skin, but it’ll prolong the shelf life of your blend!
xo Nicole
__________________
I’m a Certified Holistic Aromatherapist via the Institute of Integrative Aromatherapy. All information shared in this post is from the IIA Certification Course manuals and coursework, as well as the following books (which I recommend if you’re interested in learning more about essential oils and aromatherapy!): Aromatherapy: A Holistic Guide to Natural Healing with Essential Oils by Valerie Gennari Cooksley, RN, The Complete Guide to Aromatherapy by Salvatore Battaglia and Essential Oil Safety by Robert Tisserand.

 [amd-zlrecipe-recipe:122]