Resistance Band Core Workout

Resistance Band Core WorkoutResistance bands are the easiest piece of workout gear to pack, and when I went to visit my parents on the Vineyard at the beginning of the month, I brought one along. I wanted to do a quick ab workout to pair with my morning run, and this totally did the trick. By adding the resistance band around my legs during some of these go-to core exercises you’ve seen a million times on the blog, it changed each move from strictly targeting the abs to incorporating some outer thigh work as well.

Resistance Band Core Workout

Equipment I Used:

This workout is broken up into three parts. For each part, you’ll do three rounds of three exercises for 30 seconds each. Go from one exercise to the next without taking a break. Between parts, you can rest for 30-60 seconds. I used an interval timer and set it to 9 rounds of 30 seconds of work and 0 seconds of rest so that it would just beep every 30 seconds.

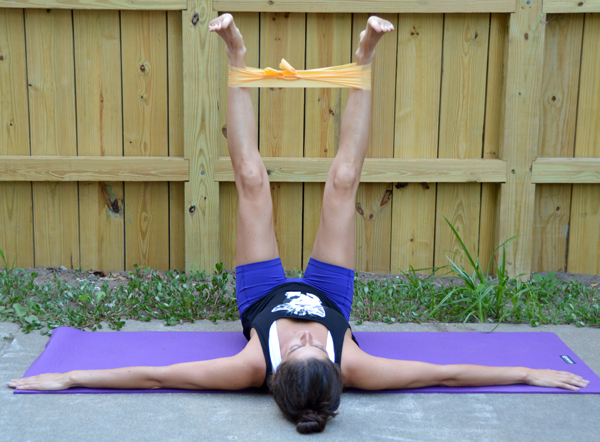
Place a resistance band around your lower calf area. I used a long one so I looped it twice before tying. You’ll keep the band in this position throughout the entire workout.

Resistance Band Core Workout

PART 1

Complete three rounds of the following three exercises, doing each for 30 seconds. For this part, you’ll be keeping your legs straight the entire time, pressing them outward against the band. Don’t cheat yourself by not pressing outward! You want to feel your outer thighs and glutes engaged the entire time.

  • Resistance Band Toe Touches: Start laying on your back with arms outstretched overhead, feet straight up in the air, resistance band around your lower calves with your legs spread wide enough apart to engage the outer thighs—you should be pressing hard against the resistance of the band the entire time. From here, crunch up, lifting shoulders off the ground and touching the band or your toes with your hands.
  • Resistance Band Windshield Wipers: Start laying on your back, arms outstretched to either side for support. Legs are lifted straight up with a resistance band around your lower calves. Press your legs out to the sides so that there is tension on the band. You want to press this way throughout the entire exercise—never let the band go slack. From here, lower your legs to the right and then back up and down to the left, back and forth in a windshield wiper motion, twisting through the waist and hips.
  • Resistance Band Leg Lifts: Start laying on your back with your hands underneath your bum for support, resistance band around your lower calves. Spread your legs out to the sides until you feel tension in the resistance band—you want your outer thighs and glutes engaged, pushing hard against that band the entire time. Lift your legs up a couple inches so that they’re hovering straight out over the ground. This is your starting position. From here, lift legs straight up so that they’re perpendicular with the ground (and still pushing out against the band). Lower them back to starting. Your feet should never come to rest on the ground.

PART 2

Complete three rounds of the following three exercises, doing each for 30 seconds.

  • Resistance Band Side Plank Lift Pulses RIGHT: Start in a side plank position, resistance band around your lower calves. Lift the top leg high enough so that there’s tension on the band—don’t let that leg drop below this point the entire time. Press the top leg up against the band, pulsing up continuously while holding the side plank.
  • Resistance Band Frog Stamps: Start in a plank position with your feet spread wide enough apart so that there’s tension on the resistance band (have it around your lower calves). From there, jump your feet up towards your hands and out wide. This will need to be an explosive movement so that you can push against the band while your feet are in the air. You want to land with your feet at least as wide as your hands (preferably wider). Quickly jump them back to starting plank position.
  • Resistance Band Side Plank Lift Pulses LEFT

PART 3

Complete three rounds of the following three exercises, doing each for 30 seconds.

  • Resistance Band Seated Spread Pulses: Start in a seated position with fingertips lightly on the ground by your sides for support. Lean your torso back, core tight (think of pulling your belly button and spine together) and lift your legs about 6” to a foot off the ground, keeping them straight. Resistance band should be around your lower calves. Holding legs at this height the entire time, press your legs out wide to the sides. You want to feel tension in the resistance band the entire time, so legs should stay wide the whole time, pulsing them out to the sides continuously.
  • Resistance Band V-Ups: Start laying on your back, arms reaching overhead, resistance band around your lower calves, and feet spread wide enough apart so that they’re pushing out against the band. Hover feet a couple inches off the ground. This is your starting point. Exhaling and explosively crunching your abs, bring your legs straight up at the same time you lift your torso off the ground, bringing hands to meet your feet, balancing on the tailbone. Release, lowering back to starting point (never let your feet come to rest on the ground). Throughout this crunch, press out with your legs against he resistance band.
  • Resistance Band Boat Pose Spread Pulses: This is just like traditional boat pose, except you’ll be pushing your legs out against the resistance band with little pulses while holding the pose. Start sitting on your tailbone with the resistance band around your lower calves. Lift your legs straight up and wide in a “v” shape. Engaging your core (I think of trying to squeeze my belly button and spine together), hold your arms straight out, parallel to the ground. Hold this pose, and as you do, push your legs out to the sides in little pulses. You always want to feel tension on the band, so never let your legs come together (or close to it). To modify, bend your knees instead of holding legs up straight.

You might recognize the structure of this workout from the 15-Minute Ab Workout I posted last year. It was featured on BuzzFeed and became one of my most popular P&I workouts, so I figured it was worth revisiting! 🙂

Resistance Band Core Workout

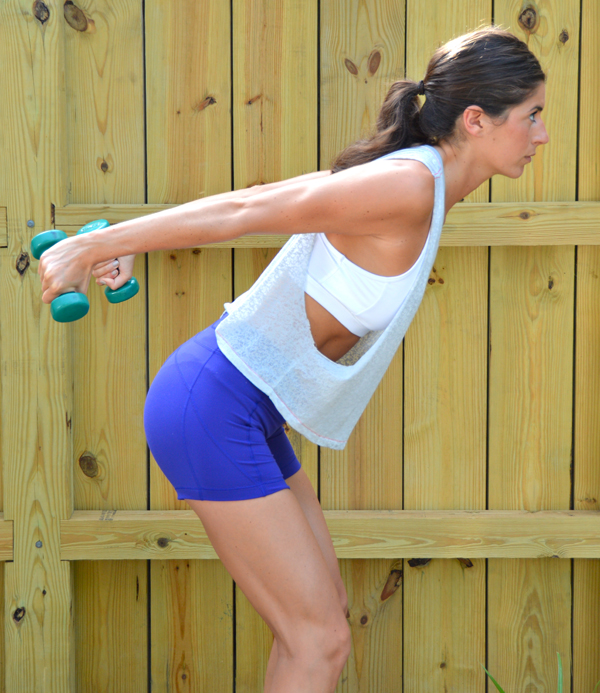
WEARING | tank: H&M // shorts: Athleta

P.S. Just to clarify, despite my tank top, I am most definitely not a cat person. Team Dog for life.

xo Nicole

Upper-Body Hand Weight Workout (Emphasis on Shoulders)

Upper-Body Hand Weight Workout (emphasis on shoulders)Yesterday I asked my Facebook page what exercises they’d want to see in the next P&I workout. I’m at my parent’s place on the Vineyard and am limited when it comes to equipment and fitness studios, so it’s the perfect time to make up some workouts that can be done in a living room or other small space. I got an overwhelming request for upper-body exercises, so here ya go!

All I could find in my parents’ house was some super-light hand weights (1lb, 3lbs & 5lbs), so I structured the workout accordingly: continuous reps, no breaks, lots of smaller movements that blend right into the next exercise. Chuck your ego at the door for this one—you may think you can handle heavier weights but those 3-pounders are going to feel like 300-pounders halfway through this workout.

Upper-Body Hand Weight Workout

Equipment I Used:

Grab a set of light hand weights (I used a 3-lb set). If you’re using an interval timer, set it for 12 rounds of 20 seconds of work and 0 seconds of rest. This way it will beep every 20 seconds, cueing you to move right into the next exercise. Do not rest between exercises. Once you’ve gone through all 12 (4 minutes total), take a 1 minute rest and then repeat. You’ll do a total of 3 rounds.

There are two ways to make this workout harder or easier to fit your current fitness level.

  1. Adjust the length of the intervals (if you’re a beginner, start by just doing 10 seconds of each exercise; if you’re advanced, try doing each for 30 seconds).
  2. Adjust the weight. If you’re a beginner, start with 1-lb weights. If you’re advanced, shoot for 5+ lb weights.

Upper-Body Hand Weight Workout (emphasis on shoulders)All these exercises are simple movements. Keep a steady pace, moving right from one to the next.

  • Straight-Arm Taps: Extend hands straight out in front of you at shoulder height. Continuously tap ends of weights together in the middle, not letting your arms drop below starting height. Make the taps hard and deliberate—really hit them together.
  • Rows: Extend arms straight out in front of you at shoulder height and then row elbows back, really squeezing your shoulder blades together, keeping hands at starting height.
  • Reverse Hug: Palms facing each other, open your arms out wide with bent elbow (as if you were approaching someone to give ‘em a big hug). Pull your elbows back behind you as if you were trying to touch them together. Squeeze those shoulder blades together!
  • Drawbridge: Start with your arms in a goal post position—elbows bent at 90 degrees out to your sides, hands up, palms facing forward. Think of a drawbridge lifting and lowering (or a lid opening and closing): rotate at the shoulders, keeping everything else locked in that position, so that hands come to shoulder height, facing the floor.
  • Shoulder Press: Start in that goal post position and then press your hands up overhead, bringing weights together above your head. Lower back down, but only so far as brings your elbows back to shoulder height. Don’t let them dip down lower than that.
  • Shoulder Shaper: Start in that goal post position and then bring your forearms in front of you, touching your hands and elbows together in the center. Like opening and closing a book. Keep elbows at shoulder height the whole time.
  • Together Ups: Start with elbows bent at 90 degrees at shoulder height, forearms parallel to eachother and in front of your face. Palms are facing you, weights touching, and elbows as close to touching as you can get them. From here, press your arms up and down, keeping forearms close to each other and parallel (your elbows will want to fan out to the sides—don’t let them!). Don’t shrug your shoulders up towards your ears while you do this.
  • Biceps Curl: Extend arms out in front of you at shoulder height, palms facing up. Curl the weights in towards your shoulders and extend back out, keeping elbows lifted the whole time.
  • Serve the Platter Reaches: This is a small movement. Start with arms extended in front of you, palms up, elbows slightly bent. Reach hands up and out (at an upward angle).
  • Lateral Arm Circles: Hold weights out to the sides with arms straight at shoulder height. Trace small circles with your hands (no more than 6” in diameter), not letting your arms lower.
  • Triceps Kickbacks: Bend your knees and lean forward slightly with a straight back. Arms come down by your sides, elbows bent. Keeping your forearms glued to your sides and just hinding at the elbow, send the weights behind you, extending your arms and squeezing your triceps.
  • Triceps Extension Lifts: In the same position as the previous exercise, hold your arms straight back behind you and, hinging at the shoulders, lift them up as high as you can and then lower just a couple inches. Think of this as a little pulse with your arms straight behind you and as high as you can get them.

Upper-Body Hand Weight Workout (emphasis on shoulders)WEARING | shorts: Athleta (old, shop current selection) // tank & sports bra: Forever 21 (old)

If anyone can get through three full rounds without cheating using 30-second intervals, let me know; you will be my new hero. I first tried these doing 30 seconds of each exercise and made it halfway through the first round before I was like there’s no effing way I can do three rounds of this. 20-second intervals were perfect—my arms burned like crazy, but with some psyching up I was able to get through the workout.

signature

Links to outfit details are affiliate.

My First Stitch Fix (Review)

Stitch Fix ReviewIf you read a lot of blogs, you’re probably no stranger to Stitch Fix. I had seen a ton of my favorite bloggers review the personal styling service and always thought it sounded cool, but ultimately never tried it out because I figured I was plenty good at doing my own shopping (much to my wallet’s dismay haha). Well I was recently invited on an exciting blogger trip hosted by Stitch Fix (it’s coming up this month—don’t worry, you’ll be reading allll about it on P&I), and they gave me a credit so that I could try out the service.

As a heads up, all the links to Stitch Fix in this post are my personal referral link—if you sign up, I get a $25 credit to my account. You get your own link with the same referral benefits if you try out Stitch Fix! Ok, boring disclosure BS out of the way, on to the review…

My first Fix totally exceeded my expectations and opened my eyes to the benefits an outside stylist can bring to your wardrobe. The jacket I kept, for example, was something I never would have pulled off the rack while shopping myself, but is so perfect—and something I know I’ll wear all the time. I’m actually wearing it now as I type this post in Starbucks. Apparently there’s a whole world of clothing out there that I never even knew I needed…this could get financially dangerous. 😉

What Is Stitch Fix?

stitch-fix-first-fixLet me back up before we get to the goods (the clothes I was sent). If you haven’t heard of Stitch Fix, it’s a personal styling service where you are sent five items handpicked by a stylist. You try them on, return the ones that don’t work in a prepaid package provided by Stitch Fix, and then go online to pay for the ones you’re going to keep. If you keep all the items in your Fix, you get 25% off the order.

When you set up your account, you can specify tons of details about your Fix. Price range, any particular pieces you need (a dress to wear to an upcoming event, for example), the type of clothing you want (office-appropriate clothes, big night out clothes, casual clothes, etc.), your style preferences (preppy, edgy, etc.)—you name it, you can customize it. You also can leave a link to a Pinterest board to help your stylist get a better idea of your personal style, which I thought was great. My Fashion board on Pinterest has a bajillion pins on it, but is a perfect collection of all the styles I love.

Last, you schedule your Fix. You can pick a regular frequency or opt for one-off packages when you need them.

My First Fix

Let’s check out the goods I got in my first Stitch Fix box! WARNING: Gratuitous amount of selfies coming your way…

Mavi Ruxin Distressed Boyfriend Jean = KEEPER

Mavi Ruxin Distressed Boyfriend JeanMy stylist, Layla, noticed that I’ve pinned a ton of distressed/ripped denim looks to Pinterest (you get a little note from your stylist in your box), and I actually have been wanting a pair for months now. I think it’s tricky for just about everyone to find a pair of pants that fit them perfectly, so I was actually shocked when I put these on and they fit so well. I’d never heard of Mavi before, but now I can’t wait to check out more of their denim!

Amour Vert Alessandro Floral Print Silk Henley Blouse = NO GO (reluctantly)

amour-vert-blouseThis top was really cute, and I actually need to invest in more quality blouses that can be dressed up or down. The only reason I decided to return it was that I wanted to keep the total price of my Fix close to the credit I was given—as I’m sure you all can sympathize with, money is always a little tight around wedding season!

Pomelo Analisse Anorak Jacket = KEEPER

pomelo-analisse-anorak-jacketAs I mentioned before, I never would have picked this out for myself when shopping. But I’m in love! It’s so adorable, but also so practical—I already know I’m going to get a ton of use out of it. This piece is a prime example of why stylists can be useful!

Shiraleah Dita Woven Hobo Bag = NO GO

shiraleah-handbagI love woven bags, and really liked the color of this, but the shape/size didn’t quite do it for me. In general, I’m also just not a huge bag person. I’d always rather spend my money on clothes and then buy cheapo handbags only when the need arises.

Tart Mallika Dotted Stripe Belted Maxi Dress = NO GO

tart-maxi-dressThis dress was pretty and fit well, but just a tad too plain for me. If I’m going to spend over $100 on a dress, I want it to have some super unique feature—an open back, cool shape, or an outrageous print—something to make me go “wow, I need that.” When I tried this on, I thought “cute, but I can find the same thing at H&M for $25.”

When you check out online, you review your Fix, so I was able to give all the above feedback to my stylist. It’ll make the next Fix all the more spot-on! I probably won’t do another one until September (again, wedding season is draining my cash flow), but this first experience has definitely made a loyal customer out of me. If you’re interested in trying it out, visit Stitch Fix.

Have you tried Stitch Fix? If so, how was your experience with it? If not, what was your favorite piece from my first Fix?

Happy Hump Day, people!

xo Nicole

And special thanks to my roomie for letting me use her mirror to take all these obnoxious selfies. You know you’ve picked an odd career when you send text messages to your friends saying “Hey! Is it cool if I use your mirror to take some selfies today? Gotta blog about some new clothes I just got.” 🙂