 Disclosure: This post was sponsored by Target® C9 through their partnership with POPSUGAR Select. While I was compensated to write a post about Target® C9, all opinions are my own.
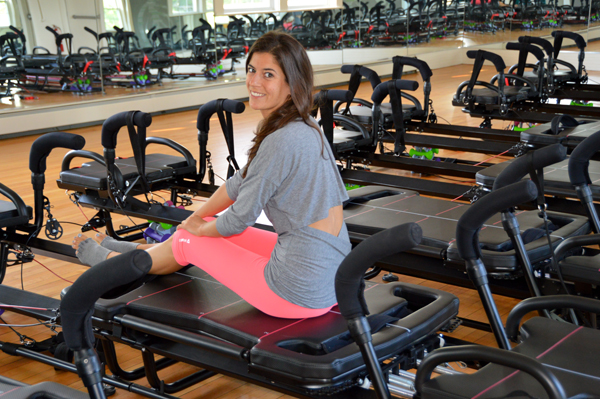
You may recall that earlier this summer I got the chance to team up with Target® to wear a couple pieces from the new Target® C9 collection in this “No Rest” Tabata Workout. Well today we’re teaming up again, this time to share some of my favorite ways to enjoy the end of summer/early fall with friends while staying active.
The weather this time of year (at least in New England) is THE BEST for taking your workouts outdoors. Some of my favorite ways to actively enjoy the changing seasons include:
Running along the Charles River
Since his hand surgery, running is one of the few exercises my boyfriend can do, so we’ve started to go for runs together around the city. With the warm—but not oppressive—weather this time of year, it’s the perfect workout (and company!).
Hiking at my parents’ place in Maine
My parents’ second home in Maine is on a ski mountain and a lake, so the hiking is GORGEOUS as summer turns to fall. Last time I was visiting, my brother and I went for a morning hike up one of the mountains and it was the perfect way to start the day.
Taking my favorite P&I workouts outside
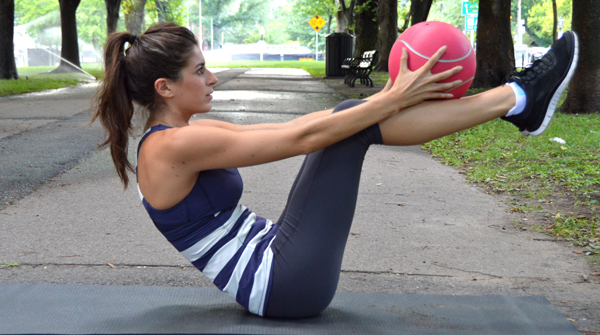
I try to shoot the majority of my workout tutorials outside because of the optimal lighting, but I actually do a fair amount of them outdoors as well! Most recently, I took this Med Ball Core Workout outside. I should add, however, that while I shot it in the middle of Comm Ave with the sprinklers going off, I did it in the privacy of my old back patio area. C’mon now, I’m not that awkward… 🙂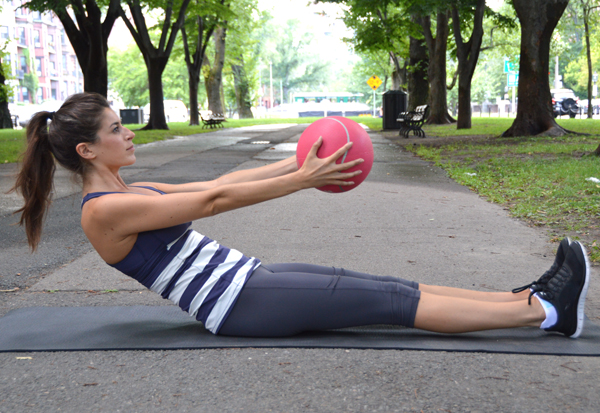
Med Ball Core Workout
Equipment I Used:
- 6-lb medicine ball
- Gymboss Interval Timer
- Exercise mat
You’ll do each of the 8 exercises for 30 seconds. Move right from one exercise to the next. Once you’ve completed them all, rest for 30 seconds, and then start right from the top. Complete 4 rounds in total. This workout will take you just under 20 minutes to complete. If you’re new to working out, you can start by completing just two or three rounds, and work your way up to four.
I set my interval timer for 35 rounds of 30 seconds of work and 0 seconds of rest. This accounts for the rest intervals and will make the timer beep at you every 30 seconds, signaling you to move onto the next exercise. You could also just watch the clock.

- Table Top Sit-Ups: Start laying on your back holding the medicine ball overhead in both hands (it should be hovering off the ground). Feet should be lifted, knees bent at about 90 degrees. From here, sit up, bringing medicine ball up overhead and in front of you, and place it carefully on your shins. Let go of it, returning to the starting position without the ball in your hands (it’s balancing on your legs still). Sit up, this time grabbing the medicine ball from your shins and bringing it back down to starting position with you. Continue to alternate: one sit-up with med ball, one sit-up sans med ball while it balances on your shins.
- Russian Twist: Start seated, holding the med ball in both hands at your chest, feet lifted off the ground with your knees bent. Lean back slightly, core engaged, balancing on your tailbone. Twist to one side, bringing the med ball to the outer side of that hip; then repeat in the other direction. Really twist at the waist—you want your chest to be totally facing whatever side you’re bringing the ball.
- Leg Lift Toe Touch: Lay on your back with arms stretched overhead, holding on to your medicine ball (it should be hovering a couple inches off the ground—don’t let it rest on the floor). Feet should also be hovering a couple inches off the ground; pull your belly button in towards your spine and press the low back against the ground in this position. From this starting position, lift both legs up so that toes are pointing towards the ceiling, keeping legs straight. Then bring the med ball up to meet them, crunching up as you lift the ball overhead, reaching towards your toes (it’s ok if you can’t physically touch them, just focus on lifting your shoulder blades off the ground as high as possible). Return upper body to starting position and then lower legs to starting position.
- Plank Roll Out (RIGHT): Start in a plank position, right hand on a medicine ball, left hand on the ground. Slowly roll your right palmàwristàforearm over the top of the ball. As you reach forward like this, you’ll need to bend your left elbow, lowering the body (but still keeping strong plank form!). Reverse the motion, rolling right forearmàwristàpalm and straightening your left elbow back to starting position as you do.
- Plank Roll Out (LEFT)
- Sit ‘n Toss: Lay on your back with arms stretched overhead, holding on to your medicine ball (it should be hovering a couple inches off the ground—don’t let it rest on the floor). Lift the medicine ball forward as you sit up, keeping arms straight, and lift it straight above your head as your body comes into upright sitting position. Bring ball into chest and toss up into the air. Catch and slowly lower to the ground, bringing ball back overhead behind you.
- Plank Jump Jacks: Start in a plank position with hands on the medicine ball. Jump both feet up towards the outside of the ball and then quickly back to a plank. Then jump feet out to the sides (like a horizontal jumping jack) and quickly back together. That’s one rep. When doing the “jack” part of this move, try to hold a strong plank alignment with your upper body—don’t let your butt pike up into the air or hips sag downward.
- Boat Pose Leg Scissors: Start in boat pose holding the medicine ball at your chest. For boat pose, you balance on your tailbone, leaning back slightly, legs and upper body lifted in a “v” shape. To do this, engage your core (I think of trying to squeeze my belly button and spine together). If you’re a beginner, instead of keeping your legs straight, bend the knees (but still keep those feet lifted!). From here, you’re going to scissor your legs, one foot on top of the other, alternating back and forth. For an added challenge, scissor them up and then down (one foot on top of the other for a few scissor kicks, and then reverse the direction, one foot below the other for a few scissor kicks).
Enjoy this workout—and time of year!
xo Nicole