Mimic the Megaformer with This Sock Workout (+BOMBAS Giveaway!)

Mimic the megaformer with this sock (or slider) workout! It'll target your core and legsGood morning! I have the whole day off from teaching which is great–I’m still trying to kick this cold so sleeping “in” (anything later than 5AM counts in my book) was much needed. I’m feeling better but still don’t want to overdo it, so my plan is to lay low today, tackle my email inbox, work on some blog projects, and maybe hit up a yoga class later on if my body is feeling up for it.

Speaking of classes, I wanted to share this fun workout that sort of mimics a megaformer, but without the machine. All you need is a slider or pair of socks worn on a hardwood floor. And speaking of socks …

Bombas Sock Giveaway

Mimic the megaformer with this sock (or slider) workout! It'll target your core and legs

With the season for giving right around the corner, my friends atBombas are offering one lucky reader a $50 giftcard for themselves AND a $25 giftcard to give to a friend or loved one. To enter, just sign up for the Bombas newsletter using the form below. The winner will be notified via email!

Even if you don’t win the giveaway, consider buying Bombas for your stocking stuffers this holiday season. Not only are they super comfortable, but for every pair you buy, Bombas donates a pair. Socks are among the most requested items at homeless shelters, and what better way to get in the holiday spirit than by supporting a company that gives back? 🙂

Legs & Core Sliding Sock Workout

This is one of those workouts that would be really great to video in real time. Ughhh I need to get on that whole YouTube thing but it just seems so overwhelming. Vlogger friends—what editing software do you use? How necessary is a mic? Haaalp.

In the meantime, I’ve done something today that hopefully will be helpful (leave feedback in the comments!). I’ve included a printable “cheat sheet” so that after you scroll through this post and see what each exercise is, you can print off the shorthand version of it and bring it with you to the gym or simply pull it up on your computer screen/smartphone as you do the workout at home.

At-Home Sock Workout

Equipment I Used:

  • Socks (you could also use gliders, a dish towel, etc.)
  • Exercise mat
  • Interval timer

This workout is broken into seven 3-minute blocks. Each block focuses on a specific exercise sequence. For each block, set an interval timer for 4 rounds of 30 sec work / 15 “rest.” Sometimes that 15 seconds is an actual rest, but other times it’s for pulses or an isometric hold.

This workout focuses on low body and core. For the low body blocks, you’ll do 3 minutes of continuous work. For the core blocks, you’ll have rest built in. Mimic the megaformer with this sock (or slider) workout! It'll target your core and legs

BLOCK 1 | Right Leg

Do this twice through (numbers indicate seconds):

  • [30] Sliding Back Lunge | Start with your right foot on an exercise mat and the ball of your left foot planted on the floor a few inches behind. Keeping your bodyweight in the right heel, start to slide backwards into a deep lunge, bending the right knee as your hips slide back and down and your left foot glides straight back behind you. When you reach your lowest point, press through the right heel as you straight the right leg and rise back up. Don’t lock the knee out straight at the top; keep a soft micro-bend in it and then slide right back down into your next lunge. Back left heel should stay lifted the whole time.
  • [15] Pulses | From your lowest lunge point (right knee should be at a 90-degree bend if possible), pulse up an inch and down an inch by pushing up through your right heel. It’s a tiny straightening and bending of the right knee, not a dipping of the back knee.
  • [30] Back Knee Pulls | From your lowest lunge point (right knee should be at a 90-degree bend if possible), hinge forward at hips slightly so that the weight of your torso is over the right leg rather than completely upright. Keeping your bodyweight in your right heel and staying low on the right leg, bend your back left knee as you slide the left foot forward and then extend it back out behind you. Try not to transfer your bodyweight into the left foot as you do it—keep it light as it slides across the floor.
  • [15] Hold | Hold your lowest lunge point (right knee should be at a 90-degree bend if possible). Weight is in the right heel.

BLOCK 2 | Left Leg

Same sequence, other side of your body.

BLOCK 3 | Right Obliques

Do this twice through (numbers indicate seconds):

  • [30] Twisted Crunches | Start in a high plank position, arms straight and wrists stacked underneath your shoulders. From here, twist your lower body to the left so that your chest and shoulders are still square to the floor but your legs face the left and your right hip is slightly closer to the ground than your left. This is your starting position. Bend the knees in towards your left elbow and then extend them back out to your twisted plank. As you do these sliding crunches, engage your right sidebody to keep the hips at shoulder height (don’t sit your bum to your heels as your feet slide in!).
  • [15] Pulse Right Knee to Left Elbow | From plank, hover your right leg and cross that knee across your body towards your left elbow. Hold it as close to the arm as possible, making physical contact if you can. From here pulse the knee in, trying to tap the arm each time.
  • [30] Twisted Crunches
  • [15] REST

BLOCK 4 | Left Obliques

Same sequence, other side of your body. 

BLOCK 5 | Right Glutes

Do this twice through (numbers indicate seconds):

  • [30] Single Leg Squat | Start standing with your  right foot on the exercise mat and your left foot on the floor. Sink down in a squat on the right side, bending the right knee and shifting your weight into the heel as you shift your hips back and down. Your left leg will stay straight as you slide it out to the side. Try to keep the weight of your torso over the right heel (don’t transfer weight into your left foot). To accomplish this, picture you’re sitting straight back into a chair on your right side; don’t let your hips shift out to the side with the left foot, press them back and down over the right heel. When you’ve reached your lowest squat on the right side, push through the right heel to stand back up, stopping with a soft, micro-bend in the right knee.
  • [15] Pulses | Hold the bottom of your squat and from there, pulse up an inch and down an inch by pressing up through your right heel. The non-target leg should slide a little across the floor as you pulse up and down on the right leg.
  • [30] Skate Non-Working Leg | Hold the bottom of your squat and keeping your bodyweight in the right heel, bend your left knee, sliding the left foot in towards the right and then extending the leg back out straight to the side. Keep your left foot light; just gingerly slide it across the floor, focusing on the isometric hold on your right, target side.
  • [15] Hold | Hold the bottom of your squat. Try not to transfer any bodyweight into your non-target foot; keep it all in your right heel.

Side view for a better form check: Mimic the megaformer with this sock (or slider) workout! It'll target your core and legs

BLOCK 6 | Left Glutes

Same sequence, other side of your body.

BLOCK 7 | Abs

Do this twice through (numbers indicate seconds):

  • [30] Plank to Pike | Start in a forearm plank with elbows stacked underneath your shoulders. Keeping your legs straight and heels lifted, pike your hips up towards the ceiling, bringing your body into an upside-down “v” shape as your feet slide across the floor. When you’ve reached your highest point, lower the hips back down to plank position.
  • [15] Body Saw | From your forearm plank position, shift your shoulders back and forward so that your body is sliding back a few inches and then forward all while maintaining proper plank form. When you come forward, stop when your shoulders are once again stacked over your elbows—don’t come any farther forward than that.
  • [30] Plank to Pike
  • [15] REST

Get it? Got it? Good. Print off this cheat sheet and get to it!

Printable Slider Workout Cheat Sheet

CLICK ABOVE IMAGE TO OPEN PRINTABLE PDF

Mimic the megaformer with this sock (or slider) workout! It'll target your core and legs

WEARING | socks c/o BOMBAS // leggings: Fabletics // tank: Juicy Couture (old but similar here) // bra c/o PRISM Sport (get 30% off your first order using THIS LINK and entering code ACTPERRY).

Good luck to everyone who enters the giveaway! Looking forward to your feedback on the printable cheat sheet. 🙂

signature

SHOP A SIMILAR LOOK:

15-Minute Upper Body Workout with Dumbbells

15-minute-dumbbell-upper-body-workout-17

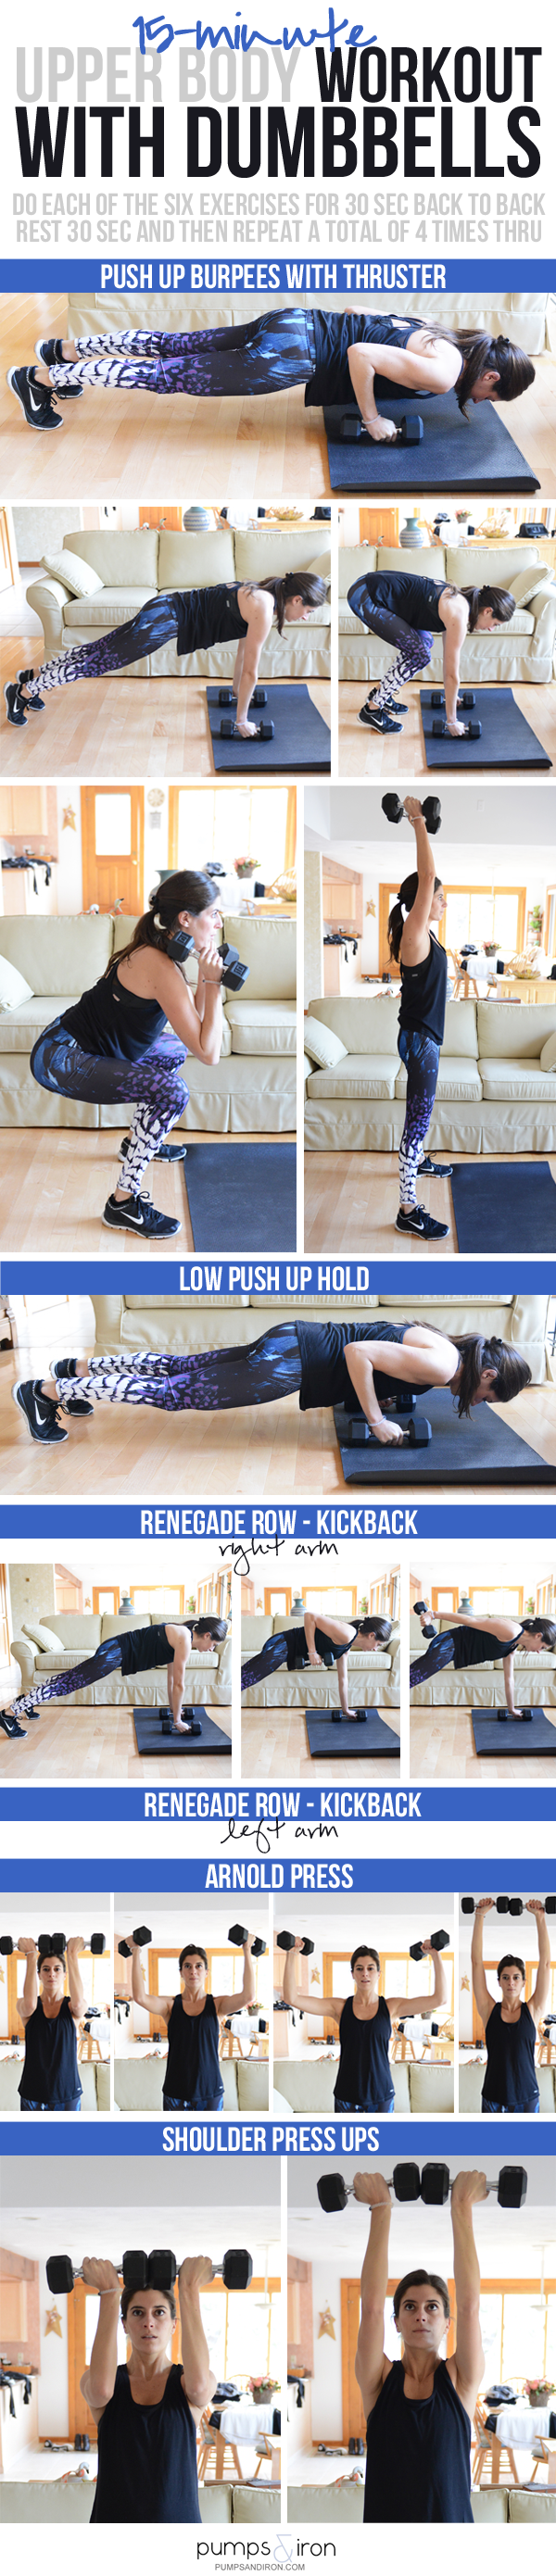
Upper body workouts always seem to be a hit around here, so I’m dishing up another one for you today. All you’ll need is a set of dumbbells and 15 minutes. Technically only 13 1/2 minutes but “thirteen-and-a-half-minute workout” isn’t exactly SEO-friendly. 😉

My friends at Express gifted me the cute workout outfit I’m wearing in today’s post, and I’m totally obsessed with the leggings. They’ve got a ton of other fun prints as well so be sure to check out their activewear collection, EXP Core.

15-Minute Upper Body Workout with Dumbbells

Equipment I Used:

  • Set of 10lb dumbbells
  • Gymboss Interval Timer

There are six exercises in this workout. You’ll do each back-to-back for 30 seconds (3 minutes of continuous work), rest 15-30 seconds and then repeat. You’ll do that a total of four times through. 15-Minute Upper Body Workout with Dumbbells

Push Up Burpees with Thruster

Start standing, feet about shoulder-width apart, elbows bent and dumbbells held at shoulders. Squat down, bringing the weights to the ground by your feet and jump both feet back into a plank position, still gripping the dumbbells. Quickly jump your feet back up by your hands and shift the weight into your feet, bringing your torso upright into a low squat position with weights back at shoulders. From here, stand up, pressing weights overhead. Squeeze your glutes and thrust your hips forward as you do this. Lower the weights and go immediately into your next rep.

Low Push Up Hold

For this, I want your hands close in to the sides of your body (tricep push up). To get into the hold with proper alignment, start in a plank position with your hands stacked underneath your shoulders. From here, roll forward slightly onto your toes so that your hands are now a little further back, aligned with your ribs (this will allow you to bend elbows to 90 degrees). Keeping your elbows close to your body, lower down to a low push up position and hold there with your body hovering off the ground, abs held in tight.

MODIFY by holding the push up from your knees. Just make sure your hips are still lowered so that your butt isn’t sticking up into the air. Think of lowering from your knees rather than your hips to achieve this. 15-minute-dumbbell-upper-body-workout-6

This one is so hard for me but I’ve been working on it a lot in yoga and have seen improvements. I can hold it for 15 seconds from my feet and then typically drop to my knees real quick to reset before popping back up into it for the last 10 seconds.

Renegade Row – Kickback (right arm)

Start in a plank position, hands gripping dumbbells stacked underneath your shoulders. From here, row your right elbow up towards the ceiling, bringing the dumbbell up towards your armpit. From here, straighten your right arm, kicking the dumbbell back and up. Try to keep your hips level as you do this. Reverse the movement back to starting plank position. If you need to modify, do these from your knees in a tabletop position.

Renegade Row – Kickback (left arm)

Same thing on the left. Try to seamlessly transition from right side to left, not dropping out of the plank at the end of the first 30 seconds.

Arnold Press

This is a shoulder press where you fluidly circle your head with your forearms at the bottom. It’s easiest to start in the middle of the movement: elbows bent to 90 degrees out to your sides in goal post position. Shoulders should be down and back, not shrugged up towards your ears. From here, press the weights overhead and together. Lower them back down to 90-degree bends (elbows should be at armpit height, no lower) and as you do, close your forearms in front of your face, rotating the palms to face you. When weights tap together in front of your face and your forearms form the number 11, reverse the movement, opening up your arms to goal post as you rotate your palm outward and press the arms straight overhead.

If you’re doing these standing, make sure you have a soft micro-bend in your knees, abs are engaged and tailbone is tucked. This will help prevent any undue stress on the low back.

Shoulder Press Ups

Imagine your forearms and elbows have magnets on them. Holding a weight in each hand, palms facing your face, hold your forearms in front of you, elbows bent at 90 degrees. Fight to hold the elbows as close to each other as you can throughout the whole movement so that they form the number 11. From here, you’re going to press your hands straight up, lifting the elbows, keeping forearms close together. Be careful not to shrug your shoulders up towards your ears as you do this. After pressing up as high as you can, slowly return back to starting.

EXP-workout-outfitWEARING | Leggings, tank & sports bra c/o EXP by Express // Sneakers: Nike

Alrighty enjoy the rest of your day!

signature

30-Minute Tabata Workout

30-Minute Tabata WorkoutHope everyone is having a great day so far! I was feeling ambitious and doubled up on classes this morning—a 6AM Btone followed by a 7:30 spin at B/Spoke. I was given a free month of FitReserve (similar to ClassPass but you can go to studios 4x a month and there are different membership/payment options), and was so excited to see B/Spoke on there. I went to my girl Steph’s class this morning and it kicked my butt per usual. I’ll go into more detail about FitReserve after I give it a full month’s test, but in the meantime you can get $50 off your first month if you sign up with THIS LINK.

Speaking of group fitness classes, I wanted to share a workout that is a truncated version of a tabata class I taught at BURN last month. I don’t regularly teach tabata, but I sub the class from time to time and always LOVE it! If you’re local and like to plan ridiculously far in advance, I’m also subbing it Thursday November 19th & December 3rd at 7:15pm. 🙂

Tabata Superset Workout

Equipment I Used:

  • 10-lb dumbbells
  • Gliders (or a dish towel)
  • Exercise mat
  • Gymboss Interval Timer

A tabata is four minutes long: 8 rounds of 20 seconds of work and 10 seconds of rest. For this workout, each tabata will consist of two exercises that you’ll alternate between: Exercise 1 for 20 seconds, rest for 10 seconds, Exercise 2 for 20 seconds, rest for 10 seconds, Exercise 1 for 20 seconds, etc. So even though there are eight rounds, you’ll only do each exercise four times.

Once you finish the first tabata, rest for 30 seconds (ish) and then move right onto the second tabata. In total, it will take you just over 30 minutes to complete the seven tabatas (taking rest into account). 30-Minute Tabata Workout

Tabata 1

  • Lunge Sliders (alternate) | My fellow megaformer addicts will recognize these as “carriage pulls.” I love finding ways to recreate mega moves off the machine! Start in a low lunge with your right foot forward, knee bent to 90 degrees and stacked over the ankle. The ball of your back left foot should be planted on a dishtowel or slider. To make these harder, hold dumbbells at your shoulders, otherwise just use your bodyweight. Hinge forward at the hips so that the weight of your torso is slightly forward, over the target right leg. This will allow you to keep your back foot light.From this starting position, slide your back left foot forward, bending the knee in and staying low on your right side. Slide it back out behind you into the starting position and continue crunching that back knee in and extending it out. The goal is to keep your weight in the right heel the entire time, staying low (think isometric hold for the right leg)—as you slide the left foot in, try not to shift your bodyweight into that foot (it’s tempting!). Another small note about form—try not to grip the ground with your right toes. If you keep the toes light and the weight back in the right heel, you’ll feel your glute kick in and really start working. It’ll also help protect your knee.
  • Jump Lunges | Start in a split-stance lunge: right foot in front, ball of left foot planted on the floor behind you. Both knees should be bent to 90 degrees, front knee aligned over ankle, back knee hovering just a couple inches off the floor. From here, push off your feet to jump up in the air, switching feet in mid-air and landing back in a lunge with left foot forward and right foot planted behind. Continue, alternating feet with each jump.

Tabata 2

  • Squat Thrusters | Hold the dumbbells at shoulder height, feet about hip’s width apart and squat down, keeping your lower abdomen held in and sliding your bum and hips back and down. Once you reach your lowest squat, power up, driving your hips forward and engaging the glutes as you straighten your legs to stand. As you do so, press the dumbbells overhead into a shoulder press.
  • Shoulder Shaper – Press Up Combo | Start with arms in goal post position: elbows bent at 90 degrees at shoulder height. From here, maintaining those 90-degree bends, bring your forearms together in front of your face. Holding your forearms close together (make the number 11 with them and picture your elbows are magnets), press your fists up towards the ceiling in front of your face. This might only be a few inches up—that’s fine (it’s tough!). Reverse the combination, lowering your elbows back down to shoulder height and then opening your bent arms back open to goal-post position, squeezing your shoulder blades together as you do. Elbows should stay at shoulder height or higher (during the press up) the entire time—let that burn build!

Tabata 3

  • Sliding Bear Crunch to Pike | Start in a plank position with your feet on a towel. Keeping your hips level with your shoulders, back flat, slide your feet forward, bending your knees in towards your elbows. Slide feet back out, straightening your legs into plank position. Now, keeping your legs straight, pike your hips up into the air, bringing your body into an upside down “v” shape. Try to keep your heels lifted as you do this, sliding on the balls of your feet. Once you hit your peak (if you have tight hamstrings, you may not be able to get your hips up very high—that’s ok!), slowly lower back down into plank position.
  • Hand Release Push Ups | Start in a plank position and begin to bend your elbows as if you were doing a push up, but instead lower your body all the way to the ground. From here, lift your chest and hands off the ground, squeezing your upper back. Lower your hands back down to the ground by your rib cage and press your body back up into a high plank position.

Tabata 4

  • Bent Row – Reverse Fly Combo | Start standing with feet about hip’s width apart, a dumbbell in each hand. Have a slight bend in the knees and hinge forward with your torso, keeping the abs engaged and sending your hips back behind you. Start by rowing your elbows back up behind you. Extend the arms back down and then perform a reverse fly: keep a soft bend in the elbows as you pull the weights out wide to the side, squeezing your shoulder blades together and engaging the back. Return back to starting position and do a row, alternating back and forth between the two.
  • Dumbbell Burpees with Thruster | Start standing, feet about shoulder-width apart, elbows bent and dumbbells held at shoulders. Squat down, bringing the weights to the ground by your feet and jump both feet back into a plank position, still gripping the dumbbells. Quickly jump your feet back up by your hands and shift the weight into your feet, bringing your torso upright into a low squat position with weights back at shoulders. From here, stand up, pressing weights overhead. Squeeze your glutes and thrust your hips forward as you do this. Lower the weights and go immediately into your next rep.

Tabata 5

  • Seated Leg Circles (alternate directions) | Start in a seated position with your fingertips lightly on the ground behind you for support. Extend your legs straight out. From here, keeping your legs straight, you’re going to circle them over to the side, up, down to the other side and back down to a hover. Think of your feet as the hands on a clock. At 6 o’clock, your torso will be reclined back at a hover; at 12 o’clock, you’ll lift and crunch your torso up and in, bringing your body into a “v” shape. Fair warning: these can be uncomfortable if you have tight hips (bend your knees slightly to make it more manageable). Alternate the direction in which you circle your legs each interval you do this exercise (clockwise, counter-clockwise, clockwise, counter-clockwise).
  • Full-Body Crunch with Dumbbell | Start laying on your back with legs outstretched and hovering a couple inches off the ground. Holding a weight in your hands, arms should be outstretched overhead and hovering as well. From this starting position, crunch up, bringing your knees in towards your chest as you lift your shoulder blades off the ground and bring the weight up and over towards your shins. Extend back out, lowering to starting position. The goal is to never bring the legs and/or weight to rest on the ground when you extend back out.

Tabata 6

  • Squat Jacks with Oblique Scoop | For the low body, think jumping jacks in a squat position. For the upper body, think paddling a canoe. This one can be like rubbing your stomach while patting your head, so don’t be frustrated if it feels uncoordinated at first—you can always eliminate the upper body movement and just hold the weight at your chest as you jump your feet in and out.Start in a low squat position with feet wide, weight in your heels, low abs engaged, hips back and a dumbbell held at your chest with both hands. Staying low in a squat, jump your feet in close together as you scoop the dumbbell down and around to the left of your left leg. As the weight comes up and back to center, jump your feet out wide again to the starting position. Repeat, this time scooping the dumbbell down and around to the right side of your legs as you jump them close together. The goal is to stay low in a squat as you jack your feet in and out, fluidly scooping the dumbbell side to side like a figure eight or canoe oar.
  • Lunge Stomps (alternate) | Shout out to Barry’s Bootcamp for introducing me to these! Start in a low lunge position with your right foot forward, knee bent at 90 degrees and stacked directly over your ankle. Ball of the left foot is planted on the floor behind you, leg is long but knee is soft. To make these harder, hold dumbbells at your shoulders; otherwise, just use your bodyweight (it’ll still be challenging—I promise!). From here, you’re going to press off the right heel as you shift your weight into the back left foot enough to lift your right foot off the ground, slightly kicking it forward in the air before landing back down in that starting low lunge position. The slight outward kick will help you land in a knee-safe position with the right heel stacked under the knee (you don’t want the knee to ever be farther forward than the toes).

Tabata 7

  • Mountain Climbers | These are like doing high knees in a plank position. Start in a plank, hands stacked underneath shoulders, core squeezing in tight (don’t let your low back sag or your butt stick up in the air). From this position, drive one knee at a time up towards your chest, like running horizontally. The pace on these should be quick.
  • Army Crawls | Put your feet on a towel and get into a plank with your forearms at the end of an exercise mat. Army crawl your way up the length of the mat, one forearm in front of the other, maintaining the plank position as you slide forward. When you can no longer go any farther forward, reverse the motion, crawling your forearms backward towards the starting edge of the mat. As you move, try to keep your hips level in a plank. They’ll want to dip side to side with each step of the forearms; use your core strength to stabilize them. Beginners: you can do these from your knees, just make sure to add an extra towel for padding.

30-Minute Tabata Workout

WEARING | leggings: Booty by Brabants // tank: H&M (old but similar here) // bra c/o WITH // sneakers: Nike

signature

SHOP A SIMILAR LOOK: