15-Minute Core Workout with a Dumbbell

15-Minute Core Workout with a Dumbbell | Pumps & IronI’m so proud of my bun in these pictures. For once my hair *almost* looks put together in a workout tutorial instead of the usual hair-sticking-everywhere-messy-slop-bun-pony-thing. This core workout will take you only 15 minutes (15 minutes 30 seconds to be exact), and you’ll just need a dumbbell. If you’re a beginner or don’t have a weight handy, forget about the dumbbell and just do the exercises with your bodyweight. It’ll still be effective!

15-Minute Core Workout with a Dumbbell

Equipment I Used

  • 10-lb dumbbell
  • Gymboss Interval Timer

There are seven exercises in this circuit. You’ll do each for 30 seconds, moving from one right to the next (no rest). Once you’ve completed all seven, rest for 30 seconds before starting again from the top. You’ll go through the circuit four times total. If you’re advanced, try to get through two consecutive circuits before resting. If you’re a beginner, only go through the circuit twice (and add additional rest time as needed in between exercises or completed circuits). 15-Minute Core Workout with a Dumbbell | Pumps & Iron
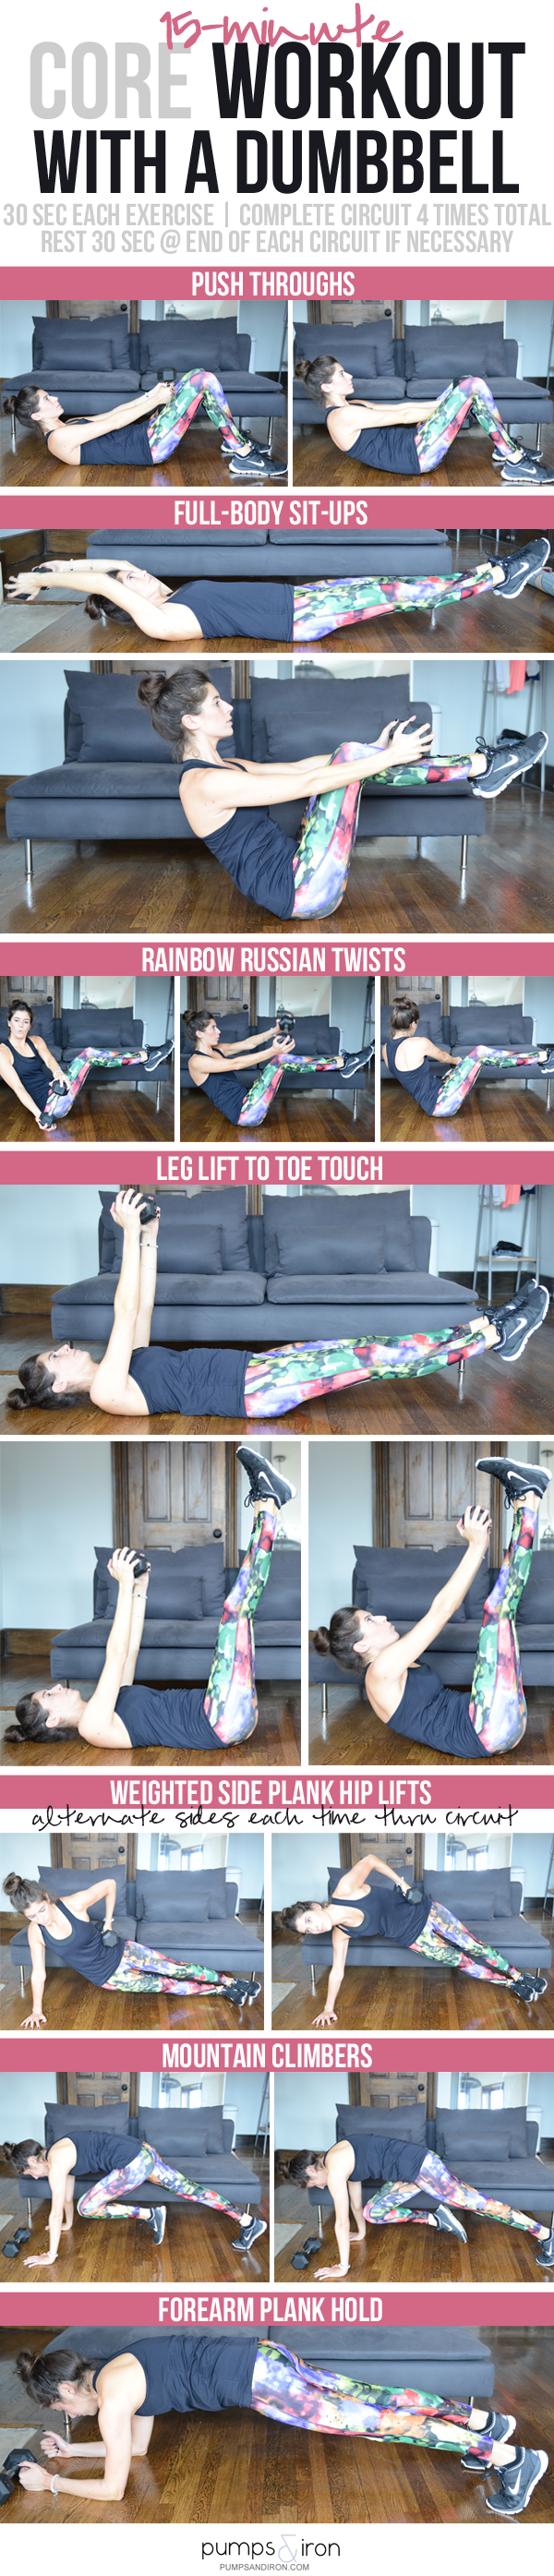
Push Throughs | Start on your back with knees bent and feet planted a little wider than hip’s distance apart on the floor. Hold the dumbbell vertically with both hands, arms straight, pointing in between your legs. Crunch up, pushing the weight as far forward through your legs as you can. Lower back down, but try not to come to complete rest on the floor. Keep your abs contracted, belly button pulling down towards the floor the entire time. This movement will be small and you should feel it in your upper abs.

Full-Body Sit-Ups | Start laying on your back with legs outstretched and hovering a couple inches off the ground. Holding a weight in your hands, arms should be outstretched overhead and hovering as well. From this starting position, crunch up, bringing your knees in towards your chest as you lift your shoulder blades off the ground and bring the weight up and over towards your shins. Extend back out, lowering to starting position. The goal is to never bring the legs and/or weight to rest on the ground when you extend back out.

Rainbow Russian Twists | These are just like your traditional Russian Twists except you’ll extend your arms out straight instead of holding the weight tight in to your body. Start seated and lean your torso back to about a 45-degree angle keeping your core engaged and your chest open (don’t hunch your shoulders forward). With bent knees, lift your feet off the ground as well so that you’re balancing on your tailbone. Hold the dumbbell with straight arms outstretched in front of you. This is your starting position. From here, you’re going to trace and arch shape with the weight (think of a rainbow), twisting from your waist as you bring the weight down to the left and then up, over and down to the right. Arms should stay straight the whole time. By having the weight away from your center of gravity, this will be more of a balance challenge than a traditional Russian Twist. If it’s too difficult, just bring the weight closer in towards your body.

Leg Lift to Toe Touch | Lay on your back with arms straight above chest, holding the fat ends of the dumbbell, shoulders stacked down into the floor. Legs should be outstretched and hovering a couple inches off the ground. Pull your belly button in towards your spine and press the low back against the ground to protect the low back. From this starting position, lift both legs up so that feet are pointing towards the ceiling, keeping legs straight. Then bring the dumbbell up to meet them, crunching up as you lift your shoulder blades off the ground, reaching towards your toes (it’s ok if you can’t physically touch them, just focus on getting as high as possible). Return upper body to starting position and then lower legs to starting position.

Weighted Side Plank Lifts | Start in a side plank position, bottom hand stacked under shoulder. Use your top hand to hold the dumbbell at your waist (it should be resting on your body, your hand is just there to keep it from falling off). From here, dip your hips down towards the ground to a hover and then squeeze your bottom sidebody to lift them back up towards the ceiling. If these bother your wrist, do them from a side forearm plank position.

You’ll alternate sides each time through the circuit. So your first and third times through the exercises, do these on the right oblique; the second and last times through, perform the exercise on the left.

Mountain Climbers | These are like doing high knees in a plank position. Start in a plank, hands stacked underneath shoulders, core squeezing in tight (don’t let your low back sag or your butt stick up in the air). From this position, drive one knee at a time up towards your chest, like running horizontally. The pace on these should be quick.

Forearm Plank Hold | Most of us are familiar with a plank, so just a couple form queues: think of stacking your joints, elbows directly below shoulders. Pull the lower abdomen in to protect the low back (think of pulling up your jeans’ zipper). Squeeze the quads above the knees—notice how engaging these muscles helps straighten out your body even more. Tuck the tailbone slightly and then fire up the entire abdomen by pulling the forearms and balls of feel in towards each other (you won’t actually move, you’ll just contract the muscles). Need more explanation? I did a whole post on common plank form errors). 15-Minute Core Workout with a Dumbbell | Pumps & Iron

WEARING | tank: Fabletics // leggings c/o PRISM Sports (get 30% off your first order with code ACTPERRY – must use THIS LINK) // sneakers: Nike

Have a great day!

signature

SHOP A SIMILAR LOOK:

Lower Body HIIT Workout

Low Body HIIT Workout (weight optional) - Pumps & IronWow. I had no idea Friday’s Lululemon post would be such a hit! But I have to admit, it made me all sorts of warm and fuzzy to see that of all posts go viral around Facebook because it was just so me. I know I’ve said it before, but writing is really my true passion. Don’t get me wrong, I’m obsessed with health and fitness, but I’ve been filling notebooks and diaries with stories since I could hold a pencil. I’m being sappy, but to watch a blog post with no frills (fancy photography, graphic tutorials, etc.) explode solely because of what I wrote was really special. I’m so grateful for all the shares, and to show my appreciation, I’ll shut up and get on with today’s workout … 😉

Lower Body HIIT Workout

As you’ll see, I used a kettlebell for this workout, but you could absolutely use a dumbbell or other form of weight. If you’re a beginner or looking to modify, forget about equipment and just use your bodyweight.

Equipment I Used:

  • 25 lb kettlebell (pick a weight that works for you!)
  • Slider (towel works, too)
  • Gymboss Interval Timer

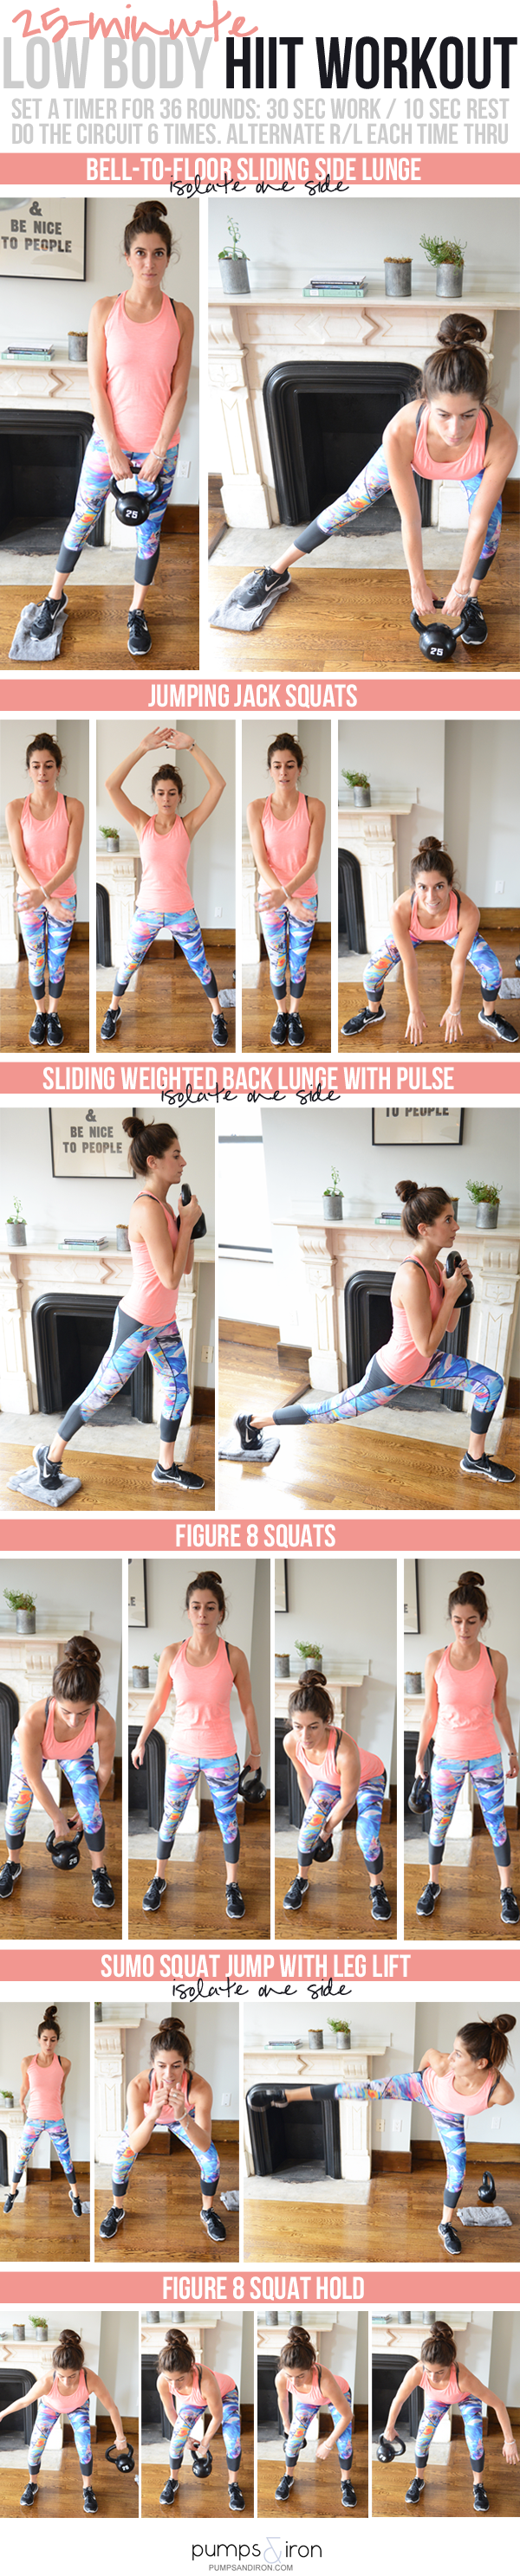
Set an interval timer for 36 rounds: 30 seconds work / 10 seconds rest. In total, this workout will take you 24 minutes. You’ll go through the following circuit of six exercises six times total. The first time you complete the six exercises, do the single-leg exercises on the right leg. The second time you complete the circuit, do them on the left. Continue to alternate each time through the circuit (this doesn’t apply to every exercise, as you’ll see).

Try not to rest after completed circuits; challenge yourself to go 30 seconds on, 10 seconds off the entire 24 minutes. That being said, if you need to add in a break at the halfway point or a few times throughout, do it! Just try to limit it to 30-60 seconds. Low Body HIIT Workout (weight optional) - Pumps & Iron

BELL-TO-FLOOR SLIDING SIDE LUNGES

Switch your target side each time through the circuit.

As far as upper body form goes, think “deadlift”—keep your back flat, chest open; don’t let the weight of the bell cause you to hunch your shoulders. Start standing with feet hip’s width apart, holding the kettlebell in both hands in front of your body. The foot of your target side (let’s say the right) is planted on the floor and your other foot (left) is lightly on a slider or towel. Keep your right foot where it is as you slide the left foot out wide to the left, lowering into a side lunge. As you lower, bend into your right knee and shift your bodyweight into the right heel as you slide your hips back and down. The right knee shouldn’t jut forward of the toes; you are sitting back into the lunge. As you lower, bring the kettlebell to lightly tap the floor on the inside of your right foot, hinging from the hips and keeping your back flat as you lower.

JUMPING JACK SQUATS

This move is very Shawn T. I feel like he probably has a fancy name for them like booty jacks or ass blasters. We’ll be boring and call them jumping jack squats today though. This is the pattern: Out, in, squat, in, out, in, squat, in …

Do a jumping jack: jump feet out, jump feet in. Next time you jump your feet out, drop down into a squat, touching the floor with your fingers (get low!) jump up and bring your feet in. Continue that pattern as quickly as possible: feet out, in, down, feet in, out, in, down … 

SLIDING WEIGHTED BACK LUNGE WITH PULSE @ BOTTOM

Switch your target side each time through the circuit.

Start standing with the target foot on the floor (let’s say right) and the ball of the left foot lightly planted on a slider or towel. Hold the kettlebell at your chest with elbows bent. Keep it here the entire time. Bending your right knee, slide the left foot back as you lower into a lunge (get the right knee to a 90-degree bend if possible). Once you reach the bottom, press through your right heel to pulse up and inch and down an inch then all the way up as you straighten your leg and rise back up to standing.

FIGURE 8 KETTLEBELL SQUATS

Start standing with feet a little more than hip width apart, holding the kettlebell in one hand. Squat down, and as you do, pass the bell through your legs to the other hand, tracing half of a figure 8. Stand up, squeezing that booty and popping your hips forward. Squat back down, finishing the figure 8 shape around your legs as you pass the kettlebell through your legs to the starting hand. So every time you stand upright, the kettlebell will be in a different hand.

SUMO JUMP SQUATS WITH LEG LIFT

Switch your target side each time through the circuit.

Squat jump, leg lift, squat jump, leg lift. Feet a little wider than hip-distance apart, squat down low, weight in heels, hips back and down. Drive up, straightening your legs as you jump into the air. Land softly, sinking fluidly right back down into a low squat. Shift your weight into the non-target side (let’s say left to be consistent) and, staying as low as you can (it’s natural for the left leg to straighten a little, but don’t come out of the bent knee all the way), lift the right leg straight up and out to the side, squeezing into your side butt (abductors if we’re being fancy). Lower it, bringing your weight back to center in that deep squat. Repeat sequence from the top, jumping right up into your next squat jump.

Low Body HIIT Workout (weight optional) - Pumps & Iron

WEARING | leggings & tank c/o Sweaty Betty – Nike sneakers

Hope you all had a great weekend! Joe was on Nantucket for a hockey tournament so mine was extremely productive (LOL … but seriously). I caught up on a bunch of blog work and subbed some classes at Btone both days. Don’t worry, I managed to fit in a jumbo bottle of wine amidst the lame adulting. 😉

signature
SHOP A SIMILAR LOOK:

Bodyweight Interval Pyramid Workout

Bodyweight Interval Pyramid Workout -- each time through the circuit, the interval length gets shorter and shorter. Each exercise ends with an isometric hold for added burn!

It doesn’t really matter how good or bad today’s workout is if I’m wearing these leggings … am I right or amirite?! Shopbop has long been one of my favorite sites for (window) shopping and my go-to for special occasion dresses, so it’s no surprise their activewear boutique is bananas. I’m beyond excited to be working with them, and for my first piece in our partnership, I couldn’t resist picking out these Kindai Frame Leggings from KORAL ACTIVEWEAR. The pattern, the mesh, the colors–they’re just too fun.

Ok back to the workout or whatever. It’s a great one to do at home, blah blah, interval timer, blah blah …

(But seriously, read on–it’s a good one!) 😉

Bodyweight Interval Pyramid Workout

Equipment I Used:

  • Gymboss Interval Timer
  • Exercise mat

You’ll complete this circuit of exercises four times. Each exercise is made up of an interval of movement followed by a 15-second isometric hold (for example, jump squats and then holding a squat in stillness). Each time through the circuit, the interval of movement gets 15 seconds shorter. Here’s the breakdown:

  • Round 1: 60 seconds movement / 15 seconds isometric (for each exercise)
  • Round 2: 45 seconds movement / 15 seconds isometric (for each exercise)
  • Round 3: 30 seconds movement / 15 seconds isometric (for each exercise)
  • Round 4: 15 seconds movement / 15 seconds isometric (for each exercise)

Don’t rest between exercises, move from one right to the next. Once you’ve completed the circuit, rest for 30-60 seconds and then start back at the top (using shorter intervals). In total, this workout will take you just under 25 minutes. Bodyweight Interval Pyramid Workout -- each time through the circuit, the interval length gets shorter and shorter. Each exercise ends with an isometric hold for added burn!

Push Ups >> Low Push Up Hold

I’m doing push ups with my arms close to the body (triceps push ups, or the type you’d see in yoga) rather than hands wide apart because these are what I need to work on. This one killed me! For the 60-second and 45-second rounds, I did these modified on my knees and then for the shorter rounds I did them in a full plank position.

Start in a plank position with your hands stacked underneath your shoulders. From here, roll forward slightly onto your toes so that your hands are now a little further back, aligned with your ribs (this will allow you to bend elbows to 90 degrees). Keeping your elbows close to your body, lower down to a low push up position and then press through your hands to rise back up, straightening your arms.

For the hold, go to that low push up position, pull your belly button in towards your spine (this isn’t just for your arms—it’s a major core exercise!) and stay there.

Squat Jump >> Squat Hold

Feet about shoulder-width apart, squat down, sending your hips and butt back and down (not the knees forward!). Bring your hands in front of you as you sink down. From there, explosively jump straight up, swinging your arms back behind you as you do. Land softly and sink right back into a squat, hands swinging forward.

For the hold, just sink right down to your lowest squat, weight in heels, abs engaged.

Bicycle Crunch Sit Ups >> Side Plank Hold (right)

Start laying on your back with your hands lightly behind your head, elbows bent out to the sides and chest open. Engage your abs, pulling your bellybutton down to the floor as you lift your legs off the ground about six inches to a hover. This is your starting position. From here, bend your right knee in towards your chest as you crunch your left elbow across to meet it, lifting your shoulders off the floor like a twisting sit-up. Your left leg should remain outstretched in a hover as you do this. Slowly return back to the starting position and continue, crunching in the same direction the entire time. The goal is to keep the legs off the ground the whole time, but if you need to modify, your left heel can quickly rest on the floor in between reps.

I’m not sure why I went with a side plank hold instead of just holding the bicycle crunch sit up at the top, but I did. Feel free to do either.

Bicycle Crunch Sit Ups >> Side Plank Hold (left)

Curtsy Lunge Hops >> Curtsy Lunge Hold (right)

Start standing with feet hip-width apart. From here, sink down into your curtsey lunge: right foot stays planted on the ground and as you bend that right knee, reach your left foot behind it as far to the right as you can until it hovers off the ground. To modify, plant the ball of your foot on the floor for stability instead. From this deep lunge position, you’re going to press up through the right foot, bringing the left knee up towards your chest as you hop straight up off your right foot. Make sure to engage your abs as you drive the knee up! Land softly on the right foot, immediately bending the knee and lowering into your next lunge.

For the hold, just stay still in that bottom low lunge position, balancing on your right foot while the left leg hovers (again, plat the left foot on the ground if you need to modify).

Curtsy Lunge Hops >> Curtsy Lunge Hold (left) Bodyweight Interval Pyramid Workout wearing KORAL ACTIVEWEAR leggings

WEARING | Kindai Frame Leggings from KORAL ACTIVEWEAR c/o shopbop // Nike sports bra & Colosseum tank c/o Kohl’s // Nike sneakers

Let’s end by talking about the friggin’ death rays I’m shooting out of my eyeballs with this intense stare. I think it’s just a bad picture but lord help me if that’s the face I naturally make while working out …death-ray-stare

Aaaand I’m done.

signature

SHOP THE LOOK: